Available Downloads
Target Platform
|
Description
|
Download
|
Instructions
|
Any
|
Complete source code.
|
Current at
GitHub |
Building
Virtual AGC from source
|
| Windows, Mac OS, Linux, Solaris, FreeBSD |
64-bit 'x86 Virtual Machine (VM) prepared
for use with the VirtualBox
hypervisor.
This VM provides the ability to run or build all
software related to Gemini, Apollo, or the Space Shuttle
that's publicly provided freely by the Virtual AGC
Project. That includes even software not covered by
the generic build-from-source instructions found later on
this page. Using the VM avoids the necessity of
manually performing tricky builds and installations, as well
as the risk that those builds or installations could fail on
your particular computer platform.
After downloading the
compressed VM, I'd recommend verifying that it has the same
MD5 checksum as listed in the next column to the right, if
only to insure that the download was not corrupted.
The commands to compute the MD5 checksum from the command
line are:
- In Windows:
CertUtil


                    -hashfile VirtualAGC-VM64-Release.7z MD5
- In Linux or Mac OS:
md5sum


                    VirtualAGC-VM64-Release.7z
Since the VM is a rather substantial download, you would
typically download the VM just once and then update it
in-place to newer versions of Virtual AGC as desired.
Updating Virtual AGC is a very simple and convenient
procedure that can be performed unattended in under 20
minutes (estimated) at any time you care to do so. On
the other hand, updates to the VM's Linux operating system
are a different matter, and should only be performed on an
as-advised basis to avoid breaking the VM's Virtual AGC
installation.
Recommended Updates
Type of Update
|
How To Do It
|
Recommendation
|
Virtual AGC Features
|
 on VM desktop on VM desktop
|
Update to 2025-04-30 or later
|
Operating System Features
|
 on VM desktop, then on VM desktop, then 
|
None recommended
|
Though designed with VirtualBox in mind, the VM can instead
be used with a little effort in some other types of
hypervisors if you so desire. (I've read, but have no
personal knowledge, that some hypervisors, VirtualBox and
QEMU in particular, can even be used to run 'x86 VMs such as
ours on ARM-based computers.) Here's a brief survey of
some of the more-popular hypervisors in which I know or
speculate that the VM will run:
Hypervisor
|
Host
Systems Supported
|
Virtual
Disk
|
Hypervisor
Cost
|
†Tested? |
Windows
|
Mac
|
Linux
|
FreeBSD
|
Solaris
|
Hypervisor
Virtual Disk Format
|
*Conversion to
Hypervisor Format
Necessary?
|
| VirtualBox |
Yes
|
Yes
|
Yes
|
Yes
|
Yes
|
VDI
|
No
|
Free
|
Yes (v. 7.1)
|
| QEMU |
Yes
|
Yes
|
Yes
|
No
|
No
|
QCOW
|
Preferred but not required
|
Free
|
Yes (v. 9.2)
|
| VMware Workstation
Pro |
Yes
|
No
|
Yes
|
No
|
No
|
VMDK
|
Yes |
$$$, but free for personal use |
Yes (v.
17.6)
|
| VMware
Fusion Pro |
No
|
Yes
|
No
|
No
|
No
|
VMDK
|
Yes |
$$$, but free for personal use |
No
|
Hyper-V
|
Yes |
No
|
No
|
No
|
No
|
VHD
|
Yes |
Free
|
No |
| Parallels |
No
|
Yes
|
No
|
No
|
No
|
HDD
|
Preferred but not required
|
$$$, but cheaper for
non-commercial use, with a free 14-day trial |
No
|
Notes:
*Conversion of the
downloaded virtual disk from VirtualBox format
(VDI) to the native format of other hypervisors
mentioned above can be performed by both
VirtualBox or by QEMU.
†All testing was
done on a Linux host machine, and the VM worked
fine for all hypervisors I was able to test.
|
|
Download the
compressed VM
The compressed VM's MD5 checksum:
094ca9ec03ac8c52d42f4e756c0985f6
Release 2025-01-07
Download: 3.7GB
Uncompressed: 20.8GB
Maximum in use: Up to 40GB
|
Installation
of the VM
Using the VM
|
| Any |
Pre-built versions of Virtual AGC are no longer provided,
other than via the VM. Obsolete downloads of pre-built
Virtual AGC and instructions for them can still be found on
our superseded
download page(s).
|
n/a |
n/a
|
Contents
The Virtual AGC VM
Use and Updating
of the VM
In general, Virtual AGC can be used in a couple of ways. One
those ways, namely installing it directly on your own personal
computer, is covered later on. The other way is to run it
within a so-called "virtual machine" (or VM for short) within what's
known as a "hypervisor". The VM/hypervisor approach should
work with all 64-bit 'x86 systems that can run the hypervisor known
as VirtualBox, including
Windows, Mac OS, Linux, Solaris, or FreeBSD. Basically, you
just install VirtualBox, download the Virtual AGC VM, and then run
it in the hypervisor! All of which side-steps any potential
inconvenience in building Virtual AGC from source code on your own
physical computer.
But before talking about how to install the Virtual AGC VM, let's
take a very brief tour of it. In other words, let's have an
advertisement for VM. Everyone loves advertisements! One
nice thing about the VM approach is that the virtual machine's
"display screen" can be made as big or small as you like, within the
limits of the size of your physical display. For the sake of
my explanations below, I'll make the VM screen smaller than I
normally would for my own purposes — which would be just to expand
it to fill an entire monitor —, but perhaps appropriately for our
modern times in which people are often more prone to use tiny laptop
computers rather than huge desktop systems.
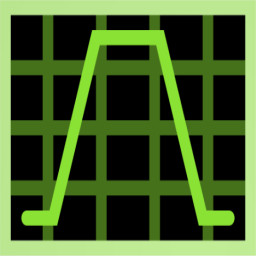
When the VM is run, the desktop you'll be presented with is
something like this:
(This desktop will actually be surrounded by a border with
VirtualBox's own menu, status bar, and so on, not to mention your
operating-system-provided title bar, but I don't want to complicate
matters so I've omitted such extras.)
What is all of this stuff? Well, it's somewhat
self-explanatory, I suspect, but here are a few of the highlights:
 Calls up an information screen,
similar to the tour you're reading now but with much
more information ... particularly about the numerous features
such as assemblers, compilers, and simulators that are available
from the command line rather than from desktop icons.
Calls up an information screen,
similar to the tour you're reading now but with much
more information ... particularly about the numerous features
such as assemblers, compilers, and simulators that are available
from the command line rather than from desktop icons.
 Opens the VirtualAGC GUI application,
which is a portal that allows you to run an AGC/AGS simulation in
a multitude of configurations.
Opens the VirtualAGC GUI application,
which is a portal that allows you to run an AGC/AGS simulation in
a multitude of configurations.
Updates the Virtual AGC software in
the VM by downloading all of the latest source code from the
GitHub repository, and rebuilding it.
 Lets you perform visual
debugging on a variety of different AGC software versions.
Lets you perform visual
debugging on a variety of different AGC software versions.
 Lets you view/edit the
electrical schematics for the AGC and DSKY as transcribed into a
modern computer-aided design (CAD) system.
Lets you view/edit the
electrical schematics for the AGC and DSKY as transcribed into a
modern computer-aided design (CAD) system.
 (Requires update 2025-02-20 or
later.) Re-displays the signal traces of the
last-performed electrical simulation of the AGC. The
simulations themselves are performed from a command line.
(Requires update 2025-02-20 or
later.) Re-displays the signal traces of the
last-performed electrical simulation of the AGC. The
simulations themselves are performed from a command line.
 Opens a simulation of the
original test panel used for debugging Apollo Launch Vehicle
Digital Computer (LVDC) software.
Opens a simulation of the
original test panel used for debugging Apollo Launch Vehicle
Digital Computer (LVDC) software.
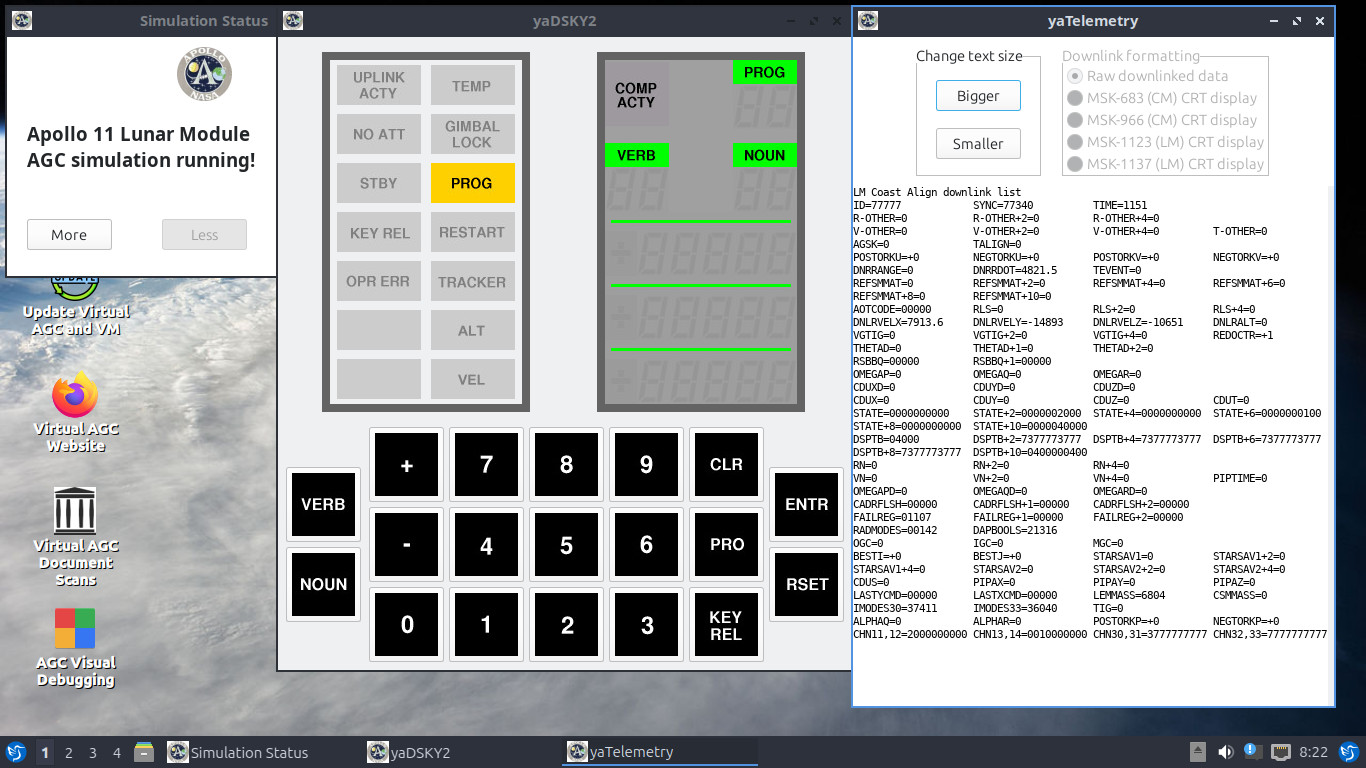
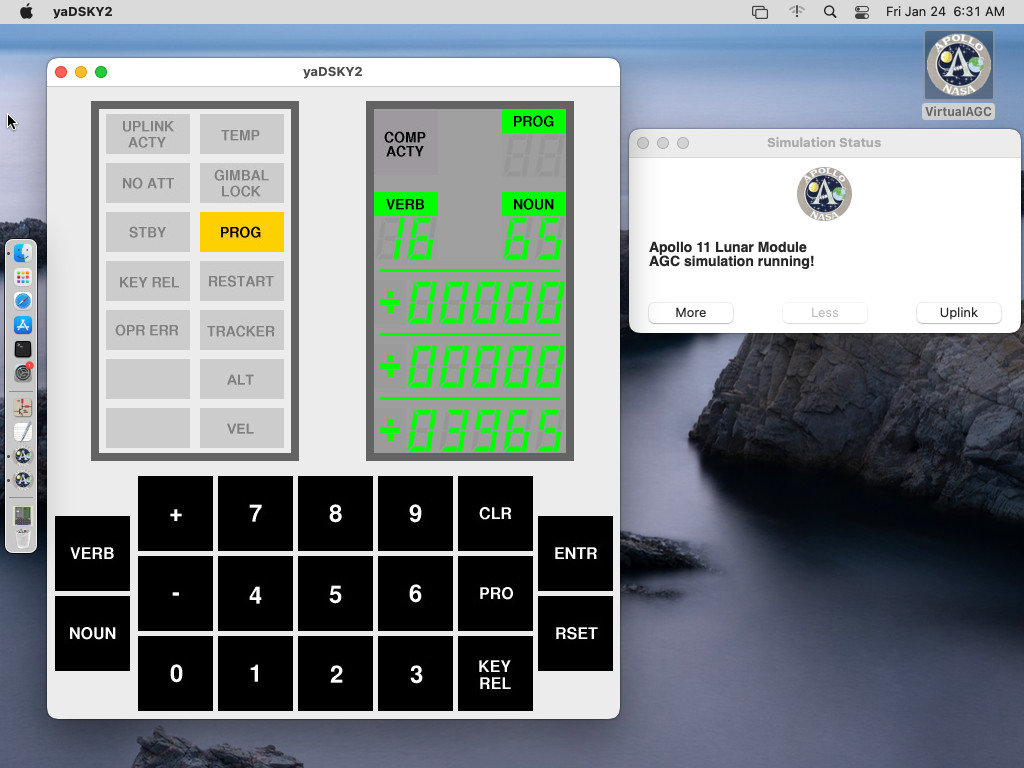
If you were to run the Virtual AGC application from its desktop icon
, you'd see something like the following:

You can do a number of things from this VirtualAGC GUI, such as run
the simulation by clicking the "Run!" button at the bottom of the
application's window. With the options shown above, this means
running the AGC software originally written for Apollo 11's Lunar
Module, which happens to be called LUMINARY 99, with a DSKY
(display/keyboard) peripheral device, and with a telemetry
monitor. The screenshot below shows that happening. The
main window of the application disappears when you do that, and what
appears in its place are the various windows for the DSKY and other
peripheral(s), arranged in a way intended to facilitate making
everything viewable at once. The extent to which this
arranging succeeds at making everything visible depends on the
options used and the amount of real estate available on the virtual
desktop. In the example below, the arranger has slightly
overlapped some windows, but has mostly succeeded. To exit the
simulation, you'd just close any one of the open windows; the other
windows would then close automatically, albeit probably with a short
delay, and the main screen of the application would return.
Aside: Actually, if you
close the window labeled "Simulation Status", it won't close the
simulation at all, but rather it closes the simulation
manager. That's a bug, not a feature, but one which I'm at
a loss to fix at present.
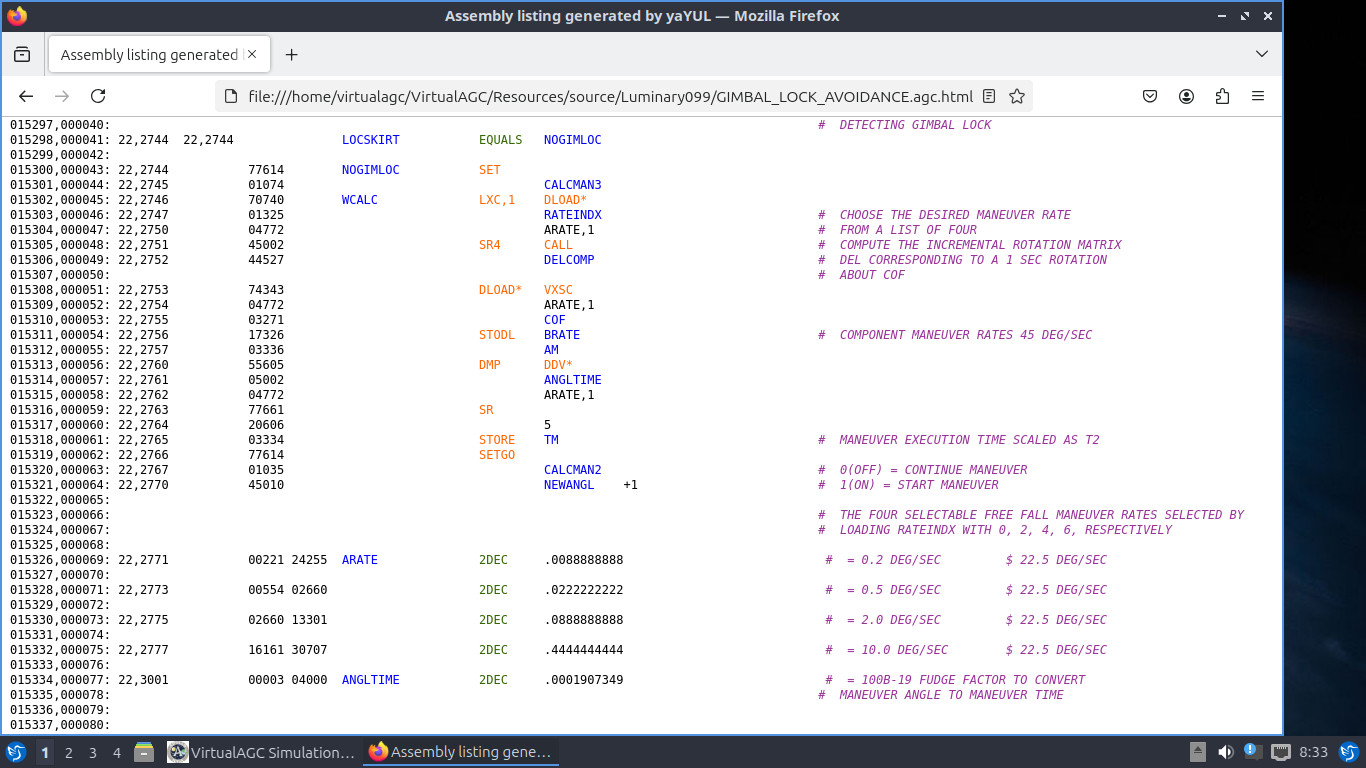
Another thing you can do is view the AGC source code (in this
case, for LUMINARY 99), by clicking the button marked "AGC" near the
lower left of the application's window. I did that and clicked
around a few times before creating the screenshot below:
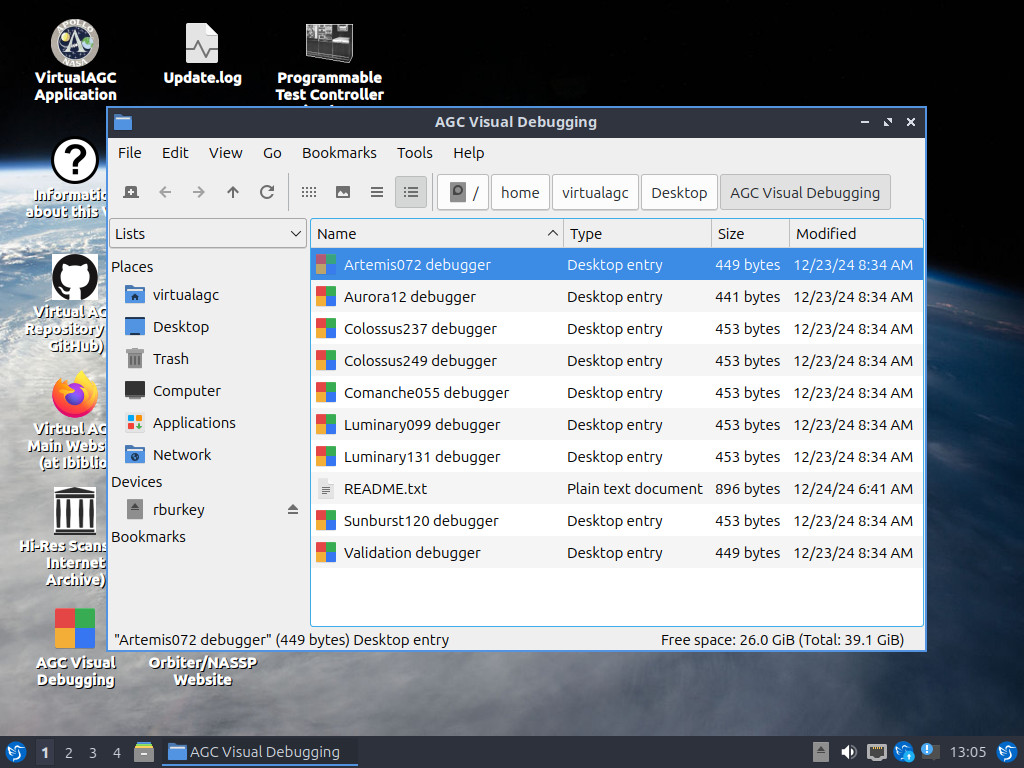
I promised above to talk a little bit about the visual-debugging
desktop icon .
If you click it, a new window will pop up that lists a number of the
Apollo Guidance Computer software versions available, though by no
means all (or even most) of them. These are just the AGC
software versions for which we've created visual-debugging
projects. Hopefully, many more such AGC versions will be
debuggable in the future, but for now these are the only ones
provided. Click on one of them to begin visual debugging of
the associated AGC software version. (Unfortunately, visual
debugging for Abort Guidance System software is not available, but
debugging can still be done from a command line.)
Visual debugging AGC software works pretty much as you'd expect, if
you've ever done visual debugging in the past. But like any
tool, the Code::Blocks integrated development environment (IDE) in
which the debugging is performed takes some getting used to.
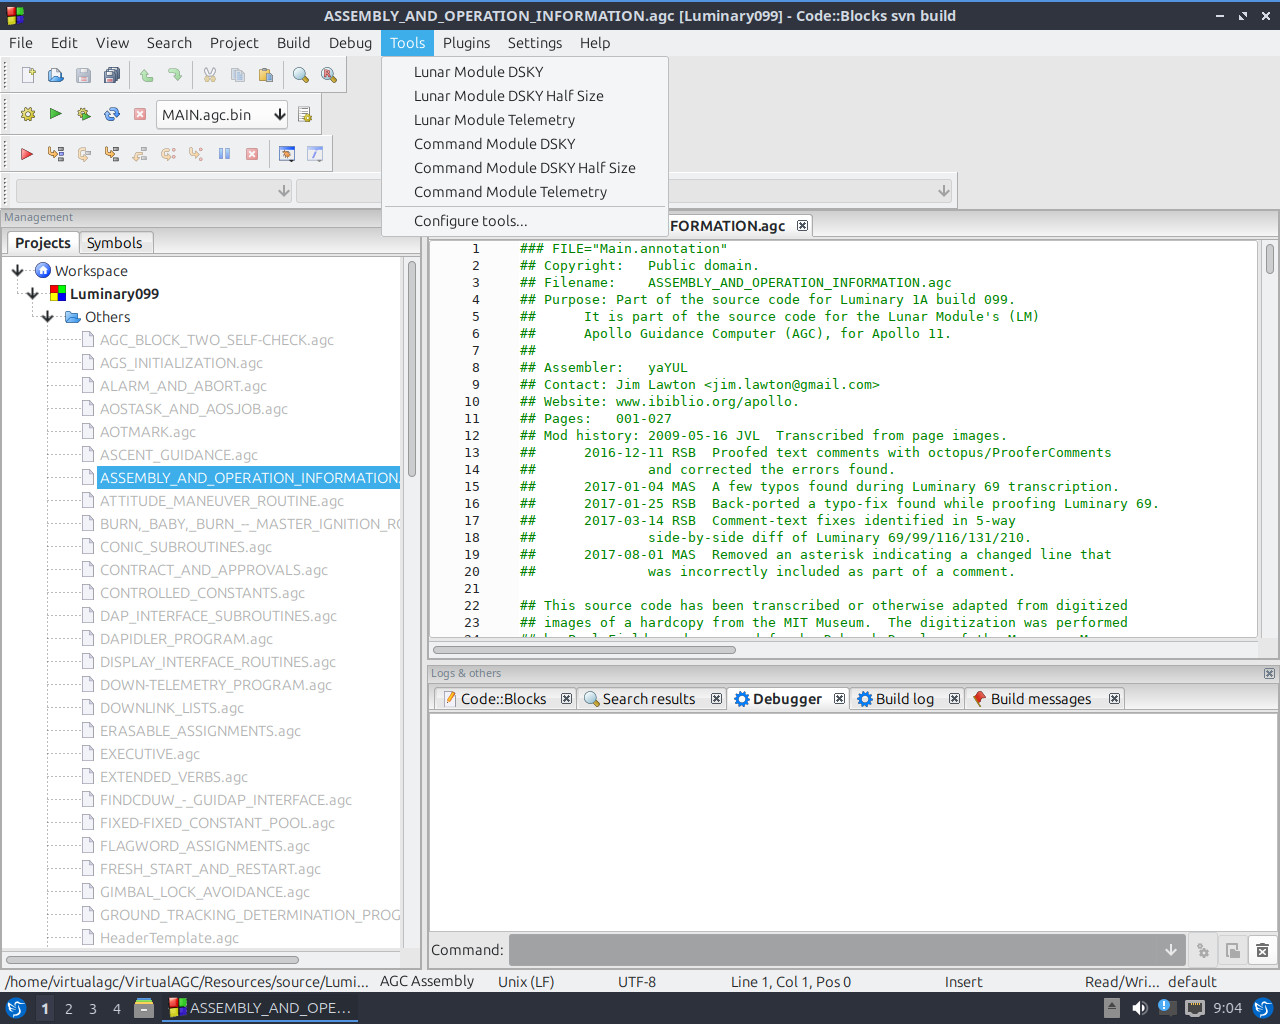
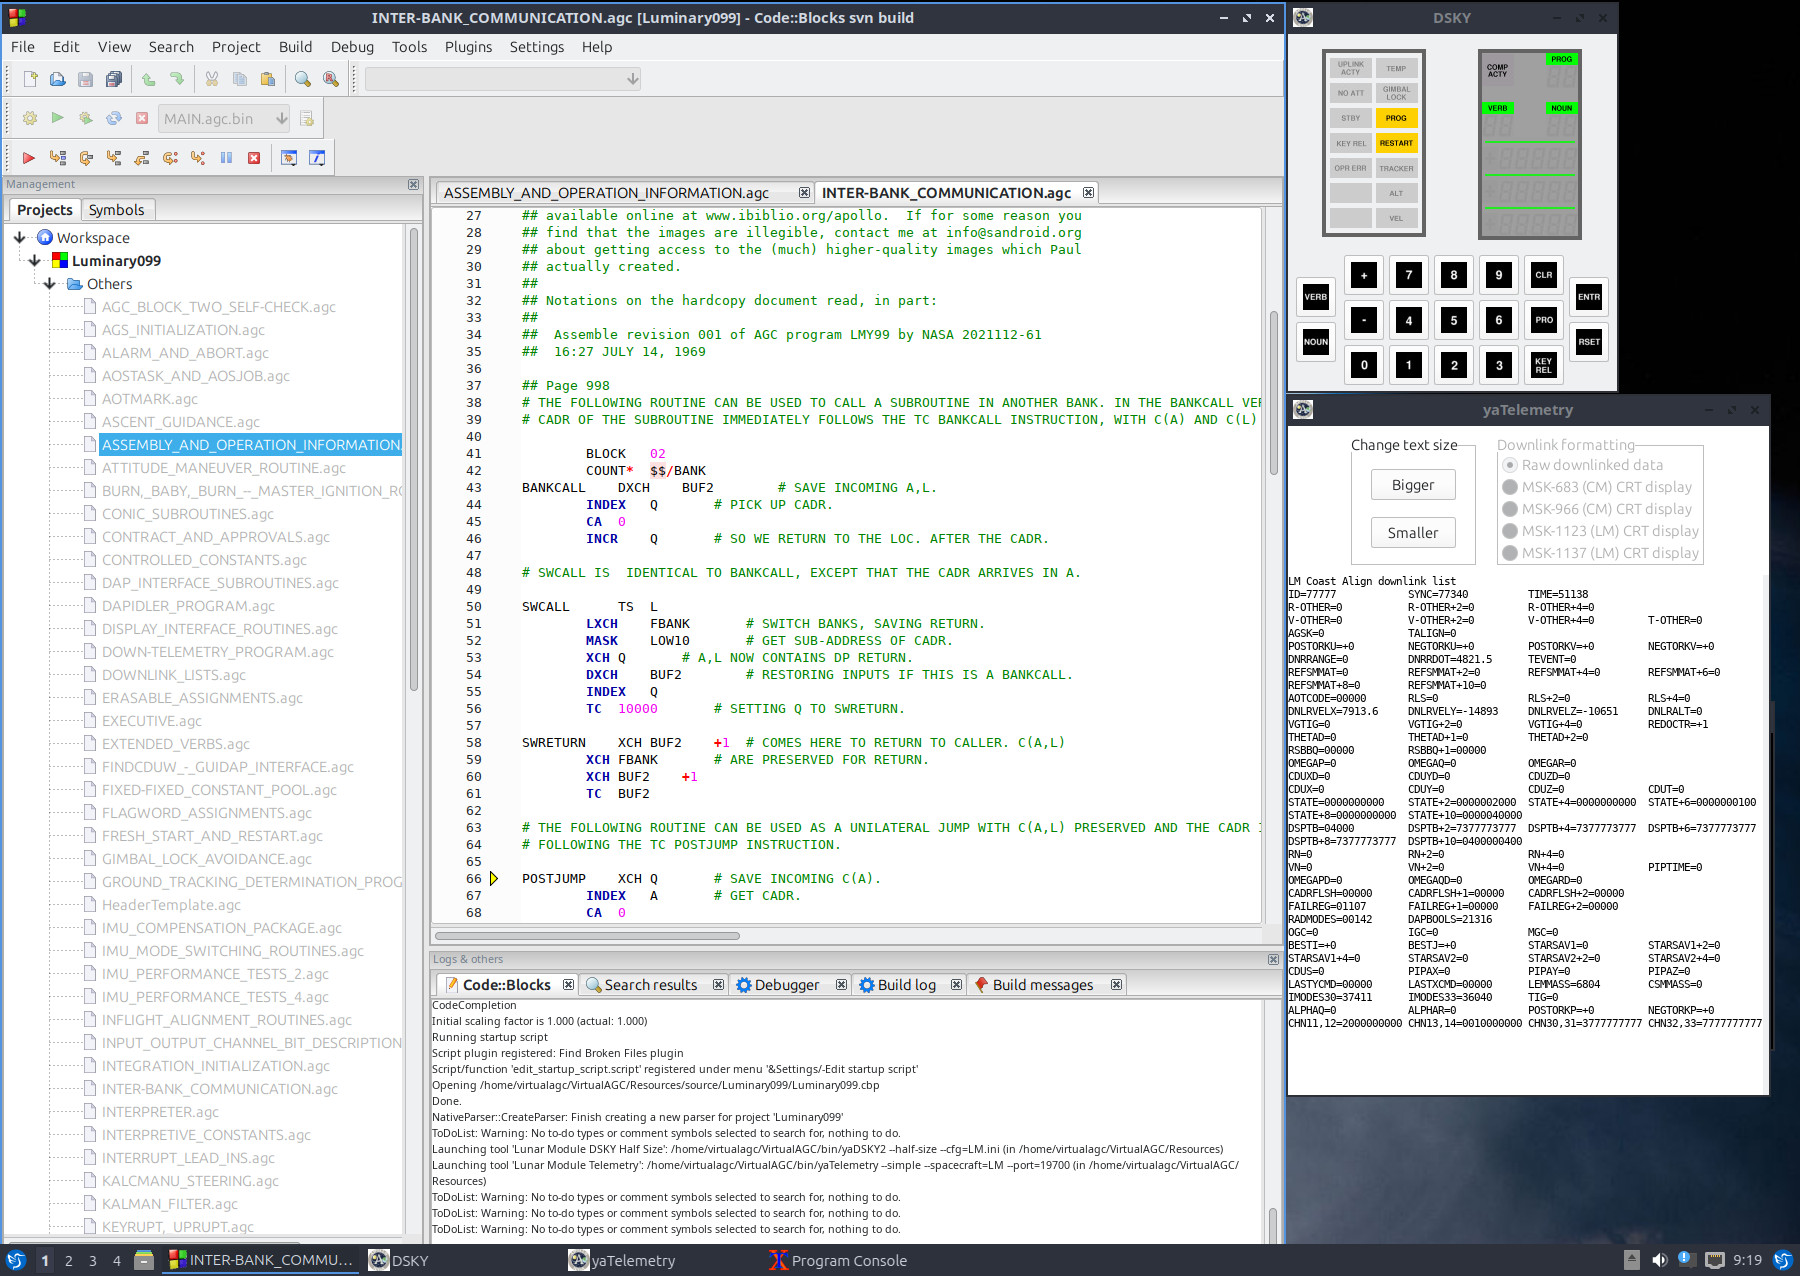
Clicking on the LUMINARY 99 entry, the Code::Blocks window that
appears looks something like the screenshot below. (Before
making the screenshot, I've actually double-clicked on one the AGC
source-code files in the left-hand pane, and then clicked on "Tools"
in the main menu.)
The reason I've clicked on "Tools" in the image above is that since
I'm illustrating how to debug LUMINARY 99 from the Apollo 11 Lunar
Module, I'll want to start a half-size Lunar Module DSKY (why not?)
and (also why not?) a telemetry monitor as well, both of which are
done from the Tools menu. The various debugging options are
found in the tool bar with the little red right-pointing
arrow. We can start the emulation in a variety of ways.
For example, we might click (twice, for some reason) the "next line"
button that's two to the right of the red arrow; this would start
single-stepping through the software. But in the screenshot
below I've started the program free-running by clicking on the red
arrow (twice), and then have clicked the pause button (once).
You can see that pause has occurred at line 66 in the source-code
file INTER-BANK_COMMUNICATIONS.agc. And from this point we can
do things like set breakpoints, single-step through the program,
view/edit memory locations, and so forth. But the details are
really out of our scope, and you'll want to consult Code::Blocks
documentation online for more info, I suppose. More
information can also be found in our Wiki at GitHub, here
or here.
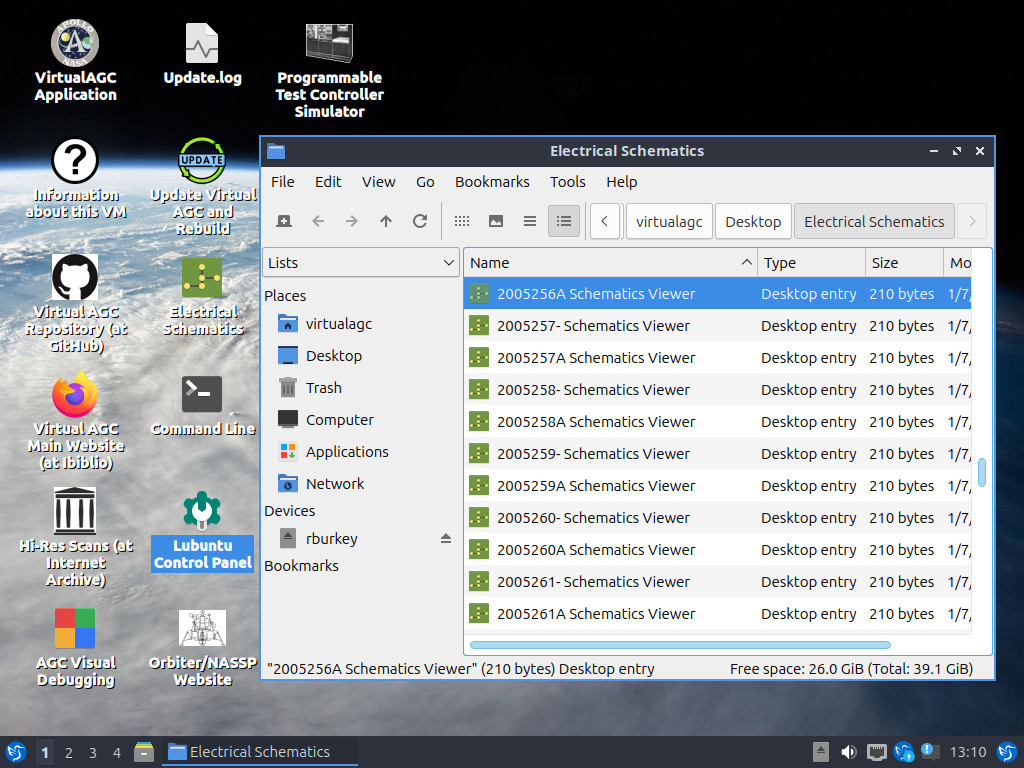
I think the VM's electrical-schematics feature is pretty nifty
too. If you click its desktop icon , you're presented with a selection of ~140
electrical-schematics to choose from:
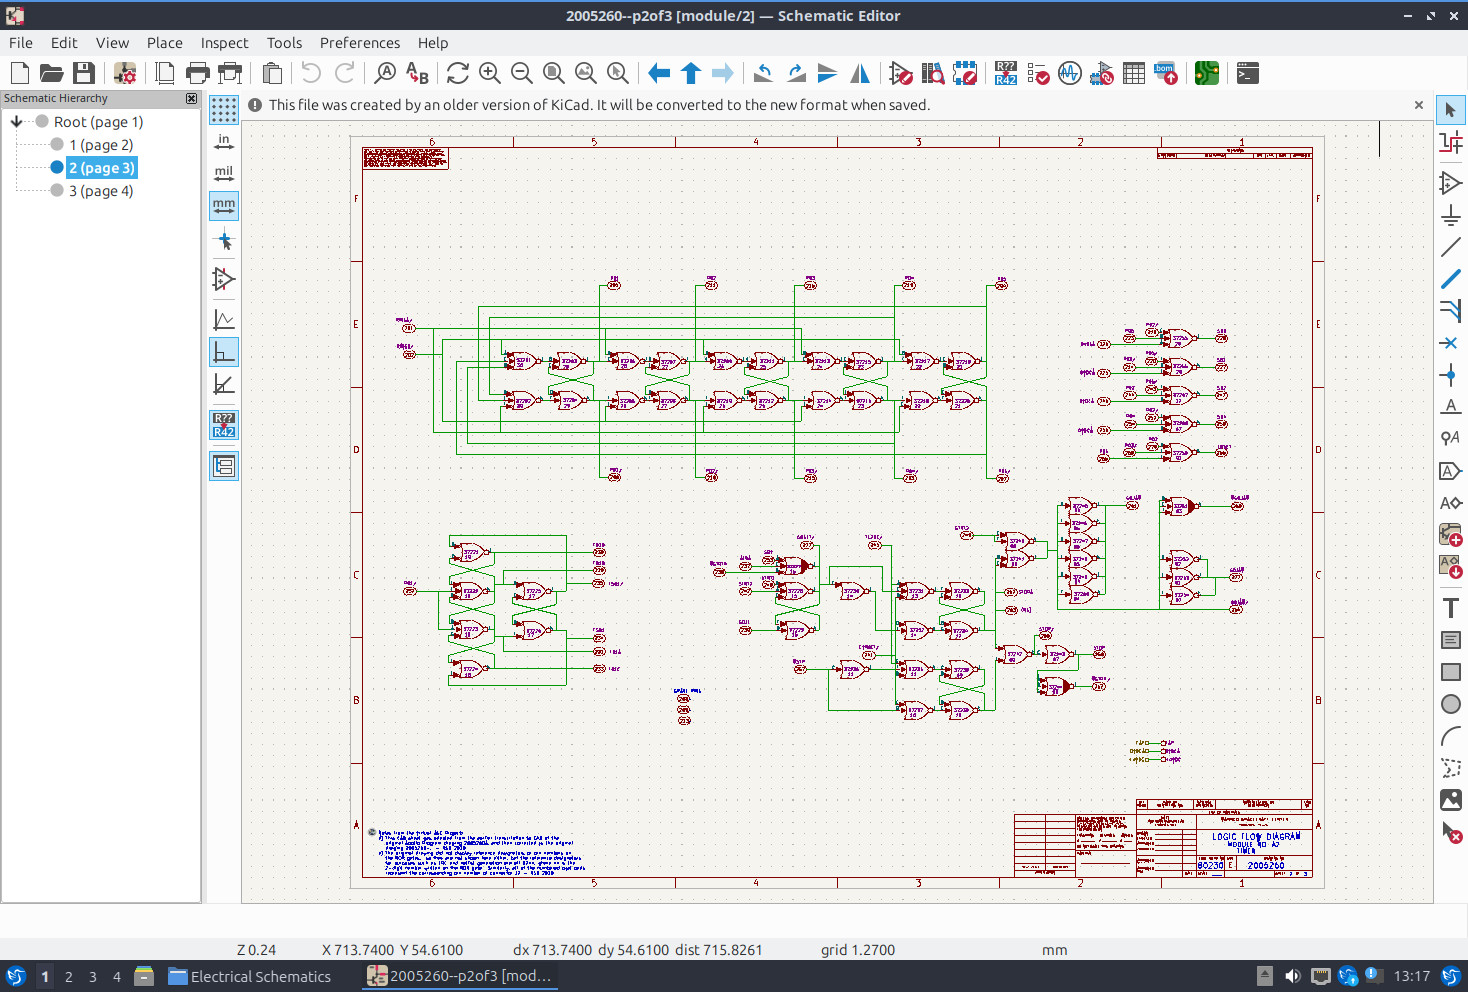
Clicking on one of those schematics opens the schematic in an
electrical computer-aided design (CAD) system, also known as an
electronic design automation (EDA) system, in which you can view the
schematic ... or for that matter, edit it or perform various other
little tricks familiar to electrical engineers:
(Requires update 2025-02-20 or later.) From a command
line, you can also perform digital simulations of circuits like the
one shown in the screenshot above, using automated conversion of the
circuit into the Verilog electronic description language. Or
for that matter, you can perform a digital simulation of the entire
digital circuitry of an AGC and run software on the simulation of
the AGC CPU's electronics. (But you can't attach a DSKY to the
electronics simulation at the moment!) While simulations are
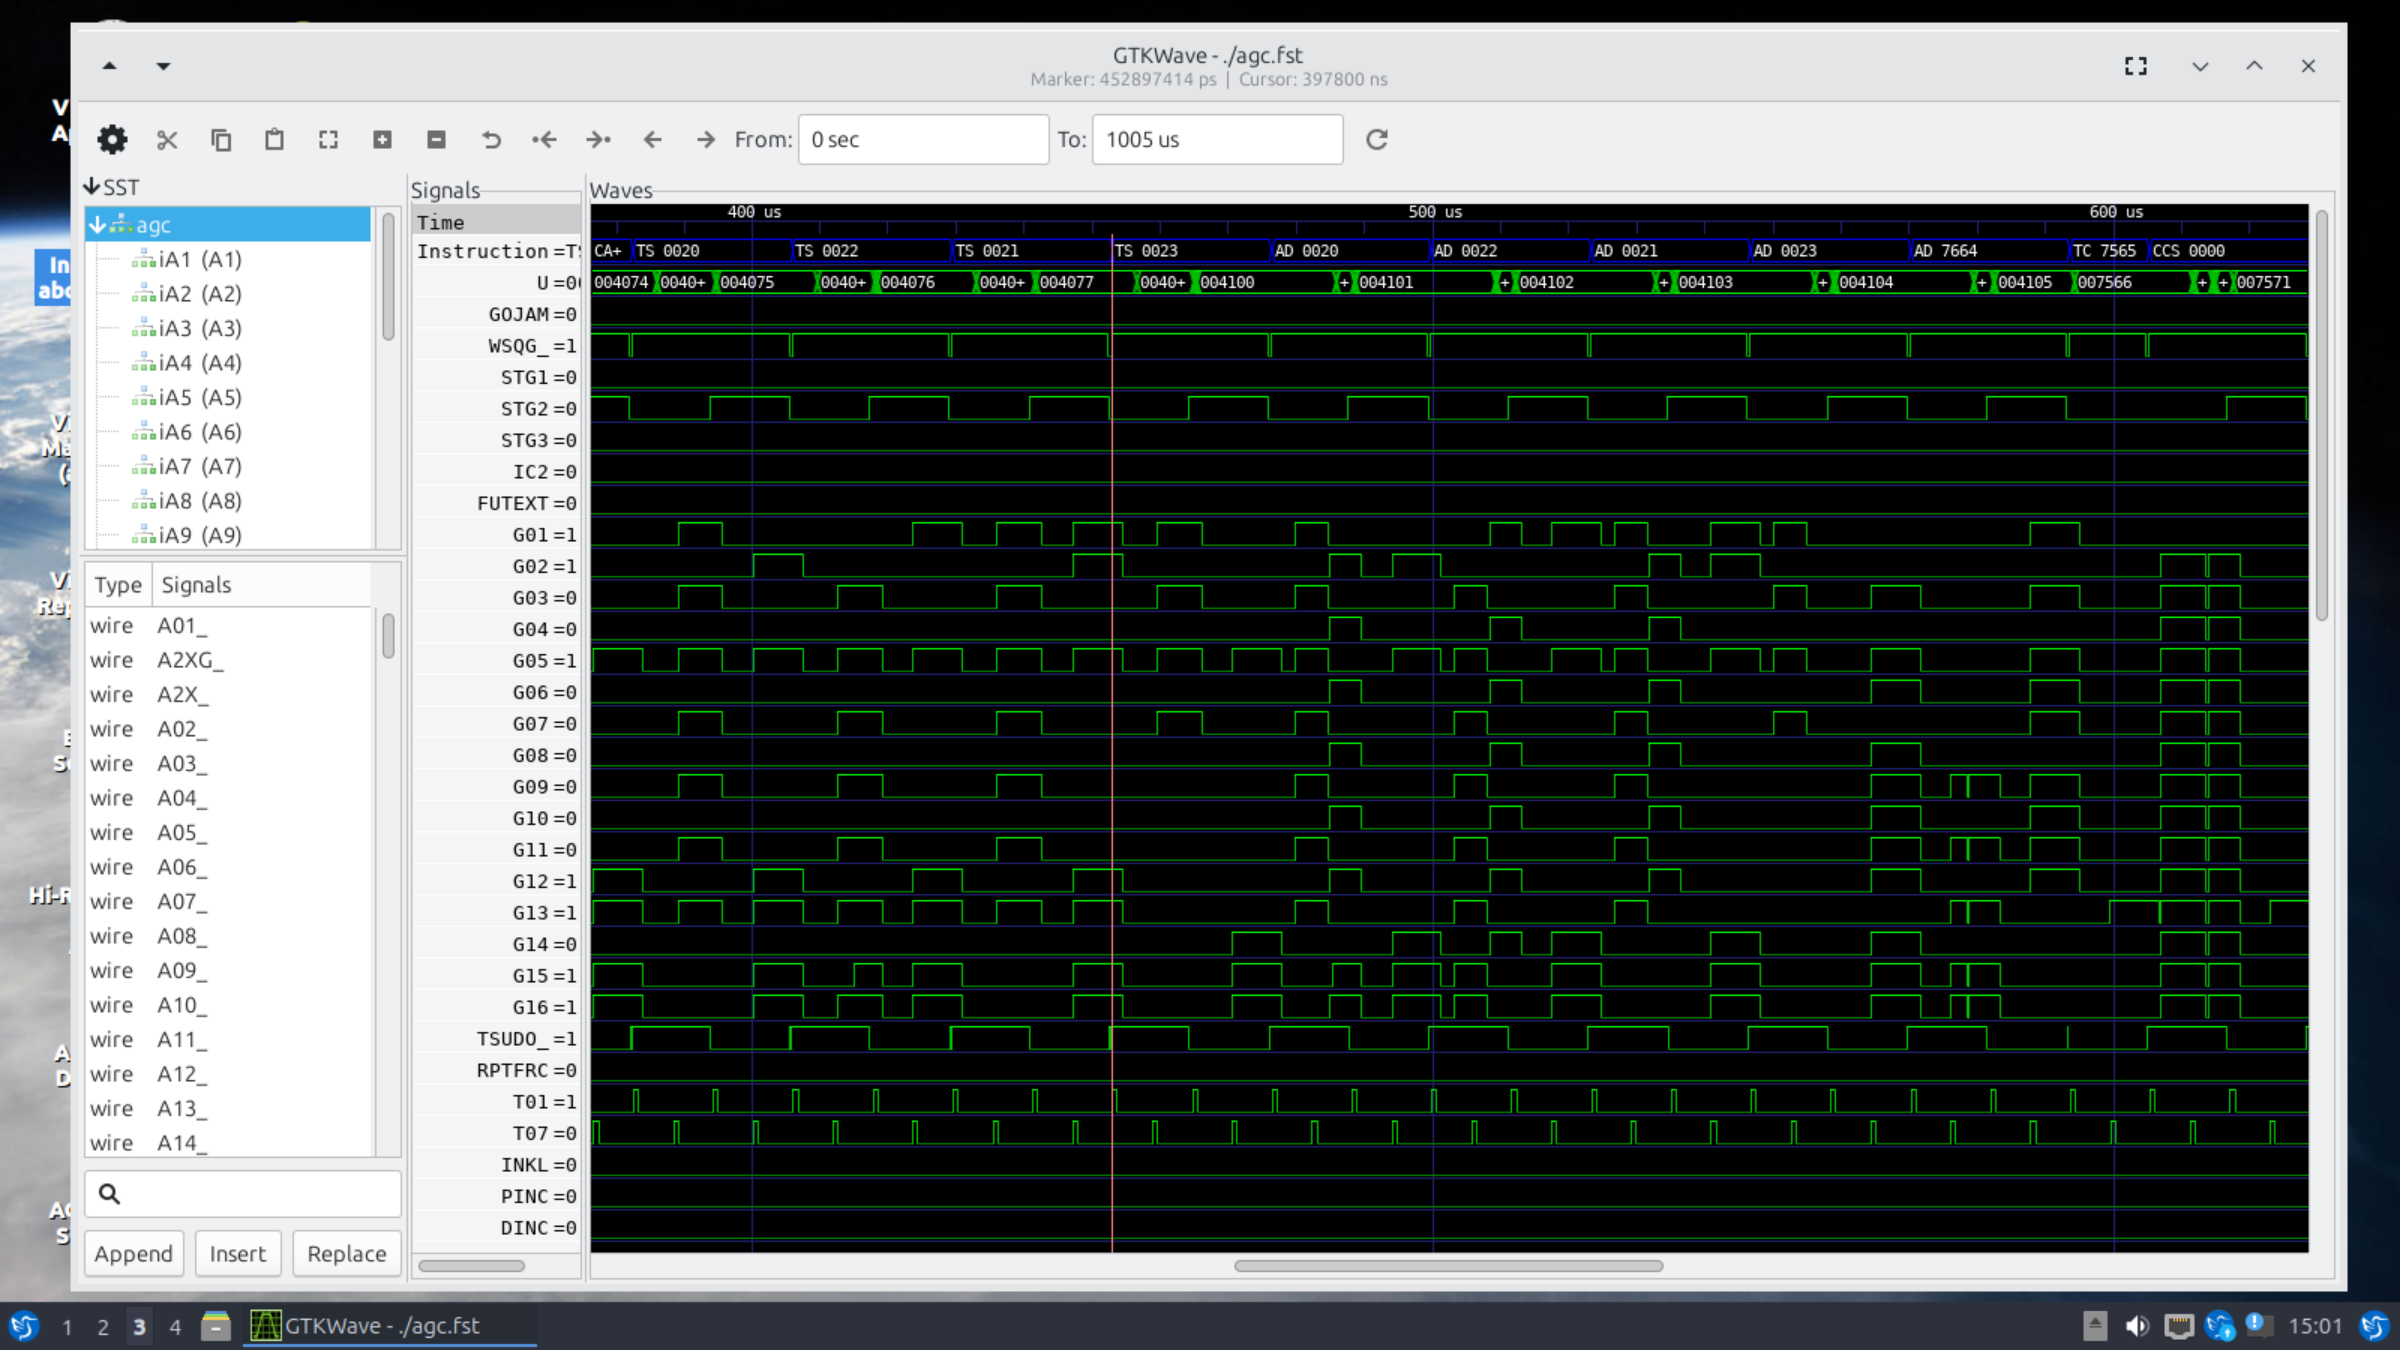
performed from a command line, you can handily re-view the results
of the last-performed simulation at any later time by using the
provided desktop icon .
However, if you do subsequently perform an update of the VM, it will
reset the last-performed simulation to the default one, so you'll
lose your last simulation if you haven't saved it before updating.
The results of the default full-AGC simulation — which is the first
millisecond of the AGC CPU running the AGC program known as
Validation — looks something like the following screenshot, in which
at the cursor (the red vertical line) we see instruction TS 0023 being executed at
address 4076, followed by instruction AD
0020 at address 4077, AD
0022 at 4100, and so on. The simulation of a
full AGC provides about 5000 separate signals, of which I'm
displaying a small, somewhat-random selection in the screenshot, but
you naturally have complete control over the signal traces that the
waveform-viewing software shows.
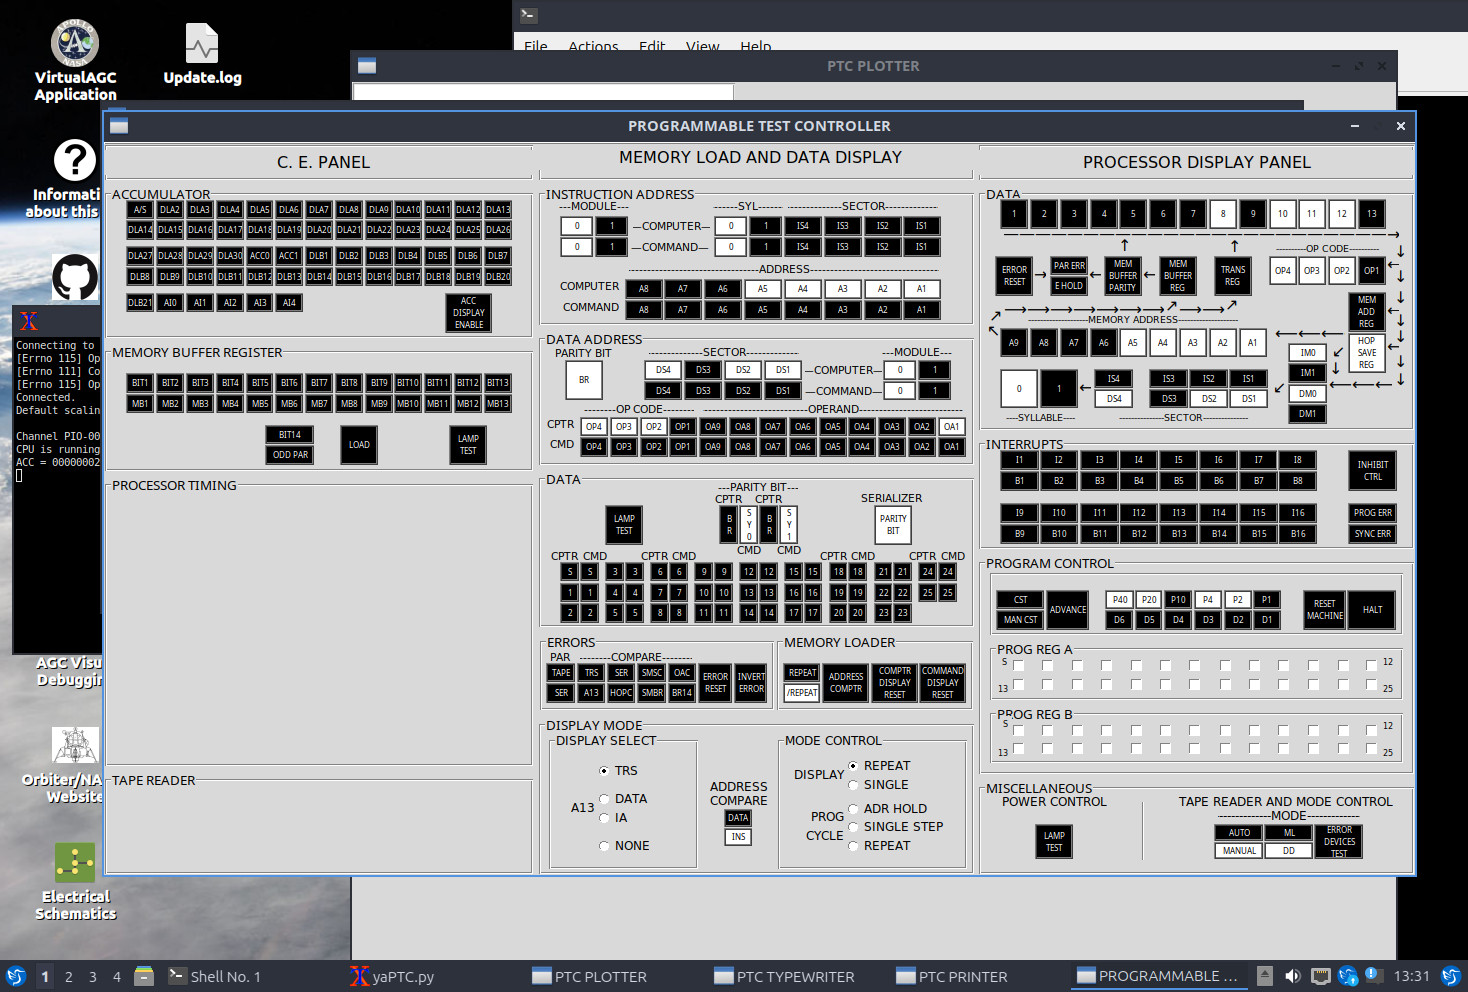
Finally, clicking on the PTC icon ,
you'd get a simulation of the LVDC's Programmable Test
Controller. That's sort of a control-panel-based approach to
software debugging, similar to the Code::Blocks visual debugging
described above, but involving push-buttons and flashing lights
instead. More convenient than having no debugger, no
doubt, but with a considerably bigger learning curve than
Code::Blocks. My, how the times have changed!
Customization of the VM
Beyond Virtual AGC itself, you might like to personalize the VM's
desktop for your own convenience and taste. For example, I
personally think that single-clicking desktop items to activate them
is better than double-clicking them, so I've configured the VM that
way. You might want to change that. (To see
instructions on how to do that, single-click on the Info desktop
icon.) Other examples that occur to me are adjusting the
language, the display size, the time zone, and so forth, but of
course you can make any changes you like. The VM runs a
variety of Ubuntu Linux called Lubuntu, and you can google how to
work with that, or you can use the Info icon on the VM's desktop to
also get a variety of helpful customization hints. I'll just
confine myself here to pointing out that I've put an icon on the
desktop labeled "Lubuntu Control Panel" from which you can open up
the Lubuntu configuration center.
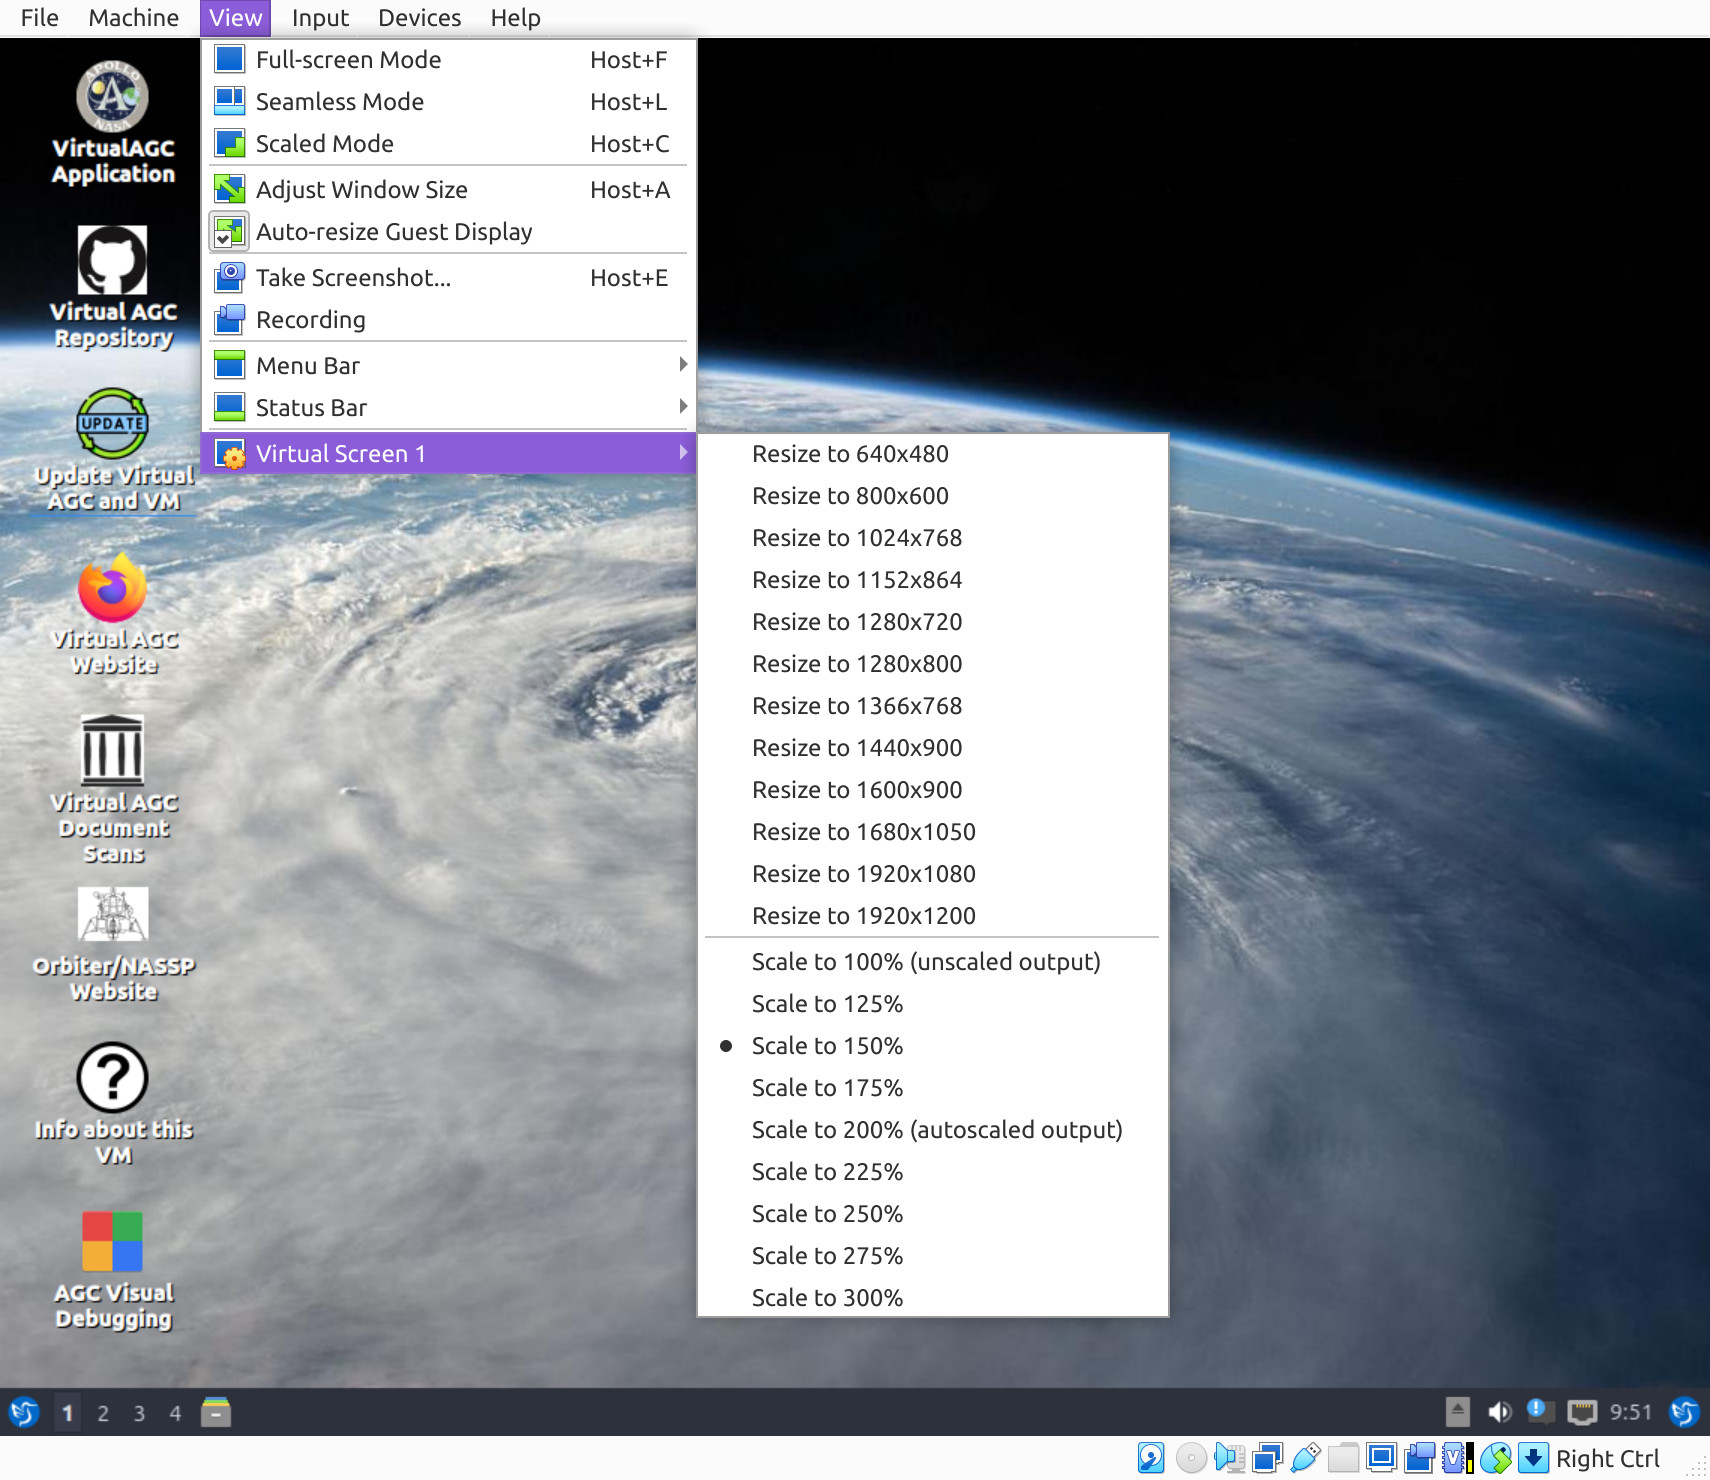
Not all of the configuration settings you need are in Lubuntu,
because some are in VirtualBox instead. If you have a
high-resolution screen such as 4K, you may find that the VM's
desktop is too tiny to be comfortably readable. VirtualBox
includes a "scaling" option that can be used to take care of that.
Setting a scale of 200% would fool the VM into thinking that a
3840×2160 display was 1920×1080, thus doubling the visual size of
everything in the VM. On my own 4K monitors, I choose to have
VirtualBox scale to 150%, as in the screenshot below:
Unfortunately, I've been unable to find any corresponding scaling
setting in the VMware or QEMU hypervisor systems, but perhaps
they're lurking in there somewhere, undiscovered by me!
Installation of the
VM
The basic steps are these:
- If VirtualBox is not already installed, download and install
VirtualBox, using whatever version is suitable for your
computer system. The Virtual AGC virtual machine (VM) you
will download was created with VirtualBox
7.1.4, but I hope it will work with other versions as
well. Be sure to install not only VirtualBox as such, but
also its so-called "Extension Pack".
- If your version of VirtualBox differs from the one in which
the VM was created, when you run the VM you may be prompted to
reinstall VirtualBox's "guest additions". Do so. If
you do, note that the username and password of the VM are both
"virtualagc".
- The VM is compressed in 7z format for downloading, so if your
operating system doesn't already have software support for 7z
archives, you need to install extra software that provides
it. In Linux and modern Mac OS, you're probably okay
without doing anything, or at worst just using your
distribution's software repository. For other platforms, a
little googling reveals that the program 7zip provides
these formats for Windows, and there are "unofficial" installers
of 7zip for Solaris and FreeBSD. However, various other
programs work as well, I think, such as WinZip.
- Download the current
compressed Virtual AGC VM.
- Extract the contents, resulting in a folder called
"VirtualAGC-VM64-Release". The 7z file is no longer used
after extraction and may be deleted ... though obviously we'd
prefer you retained it for a while to make sure you don't need
to download it again if some mishap occurs. VirtualBox
tends to store all of its virtual machines in the same folder
(on Linux, for example, that folder is "~/VirtualBox
VMs"). It's not necessary to conform to this practice,
though can do so for consistency if you like.
- Run VirtualBox, and from its main menu select
Machine/Add. In the dialog you're presented with, find the
folder just now created for the Virtual AGC VM, and select the
file VirtualAGC-VM64-Release.vbox.
- Oops, sorry! I accidentally left a couple of bugs in the
download file that you should correct right now too:
- Highlight the VirtualAGC-VM64-Release entry in VirtualBox's
left-hand pane.
- Select Settings/Display/Screen, and change the Scale Factor
to 100%.
- Select Settings/Shared-Folders, and remove the shared folder
/mnt/STORAGE/home/rburkey
- Apply any recommended updates.
- You can run the VM by double-clicking the
VirtualAGC-VM64-Release entry in VirtualBox's left-hand pane.
It's hard to pin down exactly what physical computer resources
you'll need to run the VM. As downloaded, the VM is set to use
4GB of RAM and 4 CPU cores, but those settings are adjustable easily
by you within the VirtualBox project settings. I've just now
tried it with 1GB and 1 CPU on my 10+ year old computer, and there
was nothing obviously wrong with how it ran; your experience may
vary.
Perhaps of more concern to you, I've endowed the VM with a
virtual disk that's nominally 40GB. The way VirtualBox
virtual disks work, they are actually usually smaller than the
nominal size, but physically expand as they fill up. So as
delivered, the virtual disk appears to you to be only about 20GB,
but you may later find it using 40GB of your disk. I made it
this large to allow for future expansion of capabilities.
You may think that 40GB is excessive and prefer to shave off a few
(or a lot) of gigabytes. The procedure to do so is trickier
than I'd like, so I won't explain it unless somebody actually asks
me about it. Personally, I'd suggest just googling it if
you're interested, though I'd more-vigorously suggest not
decreasing the virtual-disk size at all.
Finally, technically, for any Linux pros, the VM does not have a
swap partition. You can adjust the VM itself to give
yourself one, but if you're pro enough to desire this, you're too
much of a pro for me to instruct you on the details of how to do
it.
Using Alternate Hypervisors In Place of
VirtualBox
Here's a brief survey of some popular hypervisors:
- VirtualBox
(Windows/Linux/Mac, free).
- QEMU
(Windows/Linux/Mac, free).
- VMware
(Windows/Linux/Mac, commercial, but with a restricted-feature
free version).
- Hyper-V
(Windows only, free).
- Parallels
(Mac only, commercial).
As I mentioned earlier, the VM is intended for 64-bit 'x86
computers, but that some hypervisors like VirtualBox and QEMU
supposedly have the capability of running on an ARM host system
while running an 'x86 guest system like the VirtualAGC VM.
If you try it, let me know how it turns out.
The Virtual AGC VM is downloaded in a form specific to
VirtualBox. The VirtualBox native virtual-disk format (VDI)
that we provide in the VirtualAGC VM can be converted to any of
the following virtual-disk formats native to other hypervisors:
- VMDK (for VMware)
- HDD (for Parallels)
- QCOW (for QEMU)
- VHD (for Hyper-V)
As for how to perform such a conversion, either
VirtualBox or QEMU can convert VDI-format disks to any of the
formats listed above.
Details: At least in v7.1
of VirtualBox, conversion of a VDI file can be performed from
the VirtualBox Manager application, from it's main menu:
Select File/Tools/Virtual-Media-Manager. Then right-click
on any VDI file, choose the Copy operation, and select the
desired format to create. Alternately, conversion can be
performed from a command line with a command of the form
"vboxmanage clonemedium ...".
QEMU is more convenient in some ways, since to perform a
conversion you don't even need a full installation of QEMU, but
merely the qemu-img command-line program, which at least
in Linux Mint is a separate installation ("apt install
qemu-utils"). The command to convert to VMDK, for example,
is "qemu-img -f VDI -F VMDK VirtualAGC-VM64.vdi
VirtualAGC-VM64.vmdk". I've not actually tried it myself,
though. It's good that a full QEMU installation
isn't needed for conversion, since the technique for performing
a full install of QEMU can be a tad unobvious. At least in
Linux Mint, the technique is to use "sudo apt intall
bridge-utils virt-manager" and then reboot; QEMU itself can then
be run as the "Virtual Machine Manager". Who would have
guessed?
Additionally, for hypervisors other than VirtualBox,
you'll have to manually create a VM using the native tools
provided by the particular hypervisor, and then attach the
VirtualAGC virtual disk to that VM. In my experience,
creating a VM that uses a pre-existing virtual disk may prove to
be a tricky feat in some hypervisors — which like to create the
virtual disk for you at the time the VM itself is created,
instead of admitting you might already have one —, but I have
faith in you!
Of course, just being able to create a VM with a virtual disk in
the appropriate format for a given hypervisor does not necessarily
imply the ability of that hypervisor to run that virtual
machine! One would hope so, but believe me, it ain't
necessarily so. (I've made some conversions that won't
boot up afterward.) But in the case of the VirtualAGC VM, it
does seem okay. Here's some testing I performed:
- VMware Workstation Pro: I used VirtualBox to create a
VMware virtual disk, and using that converted disk ran the
Virtual AGC VM in VMware Workstation Pro. Once the VM was
booted up, then from a command line within it, I installed
"VMware Tools" in order to get better control over the virtual
screen, using the command "sudo apt install
open-vm-tools". (Recall that the VM's password is
"virtualagc".) The VM seemed to work fine.
- QEMU: QEMU is actually able to use the VDI file
directly, without conversion, so I didn't attempt to convert
it. The VM seemed to work fine. But! I
wasn't able to use that VDI file in Virtualbox after running it
in QEMU. So it might be a good idea to convert the Virtual
AGC VM's virtual-disk file into a QEMU native format, or at
least clone it into a separate VDI file, before using it with
QEMU.
In all of the cases I was able to try, some of the features I
like that are provided by VirtualBox were absent, though nothing
that would seriously prevent running the Virtual AGC VM in one of
these alternate virtualization systems.
Downloading and
Building Virtual AGC from Source
Limitation
Building Virtual AGC from source actually has a limitation
compared to running the VM as described above, which is that while
the VM is already set up for visual debugging of AGC code using
Code::Blocks, this capability is not a part of Virtual AGC
proper. That is, Code::Blocks based AGC debugging has its
own set of installations, requirements, and setups, distinct from
those of building Virtual AGC proper ... which is all that's
discussed below. If (once Virtual AGC is built and working
satisfactorily) you want to do visual debugging, you need to
install Code::Blocks and should consult the
instructions for development using Code::Blocks on our GitHub
wiki, as well as the
instructions
for visual debugging.
Of course, it also has the limitation that we can't actually deal
with every platform people might try to use. So I
make a pretty strong effort to make sure it works on Ubuntu- and
Debian-based 64-bit 'x86 Linux, which I use every day, and
occasionally (rarely) try to check that the process still works on
whatever versions of Raspberry Pi, Windows, Mac OS X, FreeBSD, and
Solaris it happens to be convenient for me to run personally.
Getting
the
Source Code
The complete up-to-the-moment source code is available from GitHub.
There
are several ways which one might choose to download it, such as in a
zipfile or using the 'git' program, which in Linux (for
example) would look like this:
git clone --depth 1 https://github.com/virtualagc/virtualagc
The "git clone" method has the great advantage that the download can
be updated later with a simply command ("git pull"), whereas the
zipfile methods basically requires starting over again from
scratch. In either case, you end up with a folder called
virtualagc.
What you do with it after that depends on which platform you intend
to run Virtual AGC on, and that's the topic of the next few
sections. It's also possible though increasingly unlikely that
the
instructions at the GitHub repository may (or may not) be more
up-to-date than those here.
High-Resolution Displays Such as 4K
The advent of high-resolution displays such 4K, in which the
number of pixels per inch has increased drastically but the
physical dimensions of the display have barely changed, has a
dramatic effect on graphical programs such as our yaDSKY2,
yaDEDA2, VirtualAGC, and so on, whose
user-interfaces were developed with pixel-based positioning in
mind rather than distance-based positioning. In other words,
if you run (say) yaDSKY2, designed for a 1920×1080
display, on a 3840×2160 display that's roughly the same size
physical dimensions, it's going to look very tiny. Possibly
it will be unreadable. Alas, this effect cannot always be
detected in an automated way by the software itself.
In Windows and Linux you can work around this in Virtual AGC by
defining an environment variable called AGC_SCALE
which controls the "scaling" of the graphical user interfaces in
Virtual AGC programs. In Mac OS there is a subtle
difference, in that this environment variable must be set before building
Virtual AGC, whereas in Windows and Linux it merely needs to be
set prior to running Virtual AGC. In the 4K vs
1080p example just given, you might use
AGC_SCALE=2.0
If the AGC_SCALE variable isn't defined at all, the
scaling defaults to 1.0, so you needn't bother with it unless the
Virtual AGC programs don't look right. And it doesn't matter
exactly what the scale factor is, as long as it's something
comfortable to you. In the example above, it didn't need to
be 2.0; perhaps you found 1.5 to be good enough, or 2.25 to be
better. However, not all Virtual AGC programs treat scaling
with equal grace, so 2.0 is ultimately likely to prove to be the
best choice anyway. Note too that the scaling is going to be
more "exact" if it's an exact integer. For fractional values
like 2.25, various controls in the user interface might be
positioned incorrectly by fractions of a pixel. And if large
scaling factors are used, imperfections in the graphics designed
into the user interface will become exaggerated, causing them to
appear blocky.
The method for making such environment variables permanently
available to all Virtual AGC programs — i.e., both to
programs run from desktop icons and to those run from a
command line — varies by operating-system type:
- Linux: Use a text editor (as an administrator) to edit
the file /etc/profile, and add the line "export AGC_SCALE=X.X"
to it, where X.X is whatever scale factor you
choose. Note that this won't have any effect until after
the next reboot.
- Windows: From the Windows menu, open the Control
Panel, then choose System and Security, then System,
then (in the right-hand pane) Advanced System Settings,
then Environment Variables. Create a new User
Variable called AGC_SCALE, and assign it whatever scale
factor X.X you like. This won't take effect until
you close the Environment Variables window by hitting
OK, and will only affect new command lines or Virtual AGC
programs.
- Mac OS: There is no good solution that I
can ascertain. You might be best advised to google this
yourself, for your own specific Mac OS version. But here's
a not-very-satisfactory answer that will probably work for
you: Before building Virtual AGC, close the Terminal
application if it's running, then use a text editor to edit the
files ~/.zprofile and ~/.bashrc, and add the line "export
AGC_SCALE=X.X" to both of them, where X.X is
whatever scale factor you choose. Only then should you
build Virtual AGC. In rebuilding Virtual AGC after
a change to AGC_SCALE, be sure to use the "clean" build-target.
Alternate Installations of Tcl/Tk
Tcl/Tk, and in particular the Tcl program wish, is
required for running the optional Virtual AGC component LM_Simulator.
If wish already works for you, then you can just skip this
section.
You may find, however, that wish does not work on your
computer, making LM_Simulator is unusable.
Additional setup is needed.
Aside: Why might this
happen? For example, in Mac OS versions at least
from Monterey through Sequoia:
- The version of Tcl/Tk in a base Mac OS
installation is defective. (The symptom is that the
Tcl/Tk program wish crashes instantly when invoked.)
- The defective version of Tcl/Tk cannot be
uninstalled, since Mac OS regards it as essential.
- A new, non-defective version of Tcl/Tk can
be installed by various means that bypass the Apple
Store. (But even then, the new version would typically
be installed in a folder that may have a lower priority in
the PATH environment variable than the original defective
version, invoking wish from a command line may
continue to run the defective version rather than the new
installation.)
If you haven't done so already, the first step is to install a
correctly-working version of Tcl/Tk on your computer, using
whatever method is appropriate for your computer. On Mac OS,
for example, appropriate methods might be via Homebrew, MacPorts,
or (my recommendation) building Tcl/Tk from source. As long
as wish works after doing so, you're fine!
If wish is not working once you've installed a
good version of Tcl/Tk, it's presumably because the version of
Tcl/Tk you've installed is not the one being found when wish
is used from a command line. You could just alter
your PATH to insure that your chosen version of Tcl/Tk is one
being found, though in principle such a change to your PATH could
have undesirable side effects. A workaround that eliminates
any undesirable side effects by isolating any effects to Virtual
AGC alone is to create an environment variable called AGC_WISH.
This environment variable must be assigned a value which is the
path to your preferred correctly-working installation of
Tcl/Tk. Specifically, it's the name of the folder in which
the Tcl program called wish is found. This path must
include a trailing path separator native to your system: \
for Windows or / for all others. For example, on Linux or
Mac OS, a default installation of Tcl/Tk would place wish
at /usr/bin/wish, whereas an alternate installation might put it
in /usr/local/bin/wish, so you would assign AGC_WISH=/usr/local/bin/.
The methods for permanently creating an environment variable are
described in the preceding section.
Regarding wxWidgets
wxWidgets is a cross-platform toolkit, suitable for
writing software have a graphical user interface (GUI) that can be
used with a simple recompilation on any platform supported by wxWidgets.
In other words, using a single base of source code, Virtual AGC
can be recompiled to run on Windows or Mac OS or Linux or
wherever.
In building Virtual AGC from source, version 2.8 of wxWidgets
has been recommended for a long time, and the instructions given
below often rely on this fact. However, I have observed that
it is becoming increasingly difficult to even put together a setup
having a working version of wxWidgets 2.8 in Linux,
because its prerequisites often conflict seemingly irreconcilably
with components of default installations of Linux. Indeed,
it's not even clear to me if the current Virtual AGC code base
compiles with wxWidgets 2.8, or it it works once compiled,
because I seem to have to working installation upon which to test
it. Moreover, I have no working installations of 2.8 on Mac
OS or Windows to work with.
Virtual AGC is thus currently being developed using wxWidgets
version 3.2. Given a choice between wxWidgets 2.8,
3.0, or 3.2, choose 3.2.
CMake-Based Builds
Because I am lazy, I prefer to develop software only with the
tools I already know and understand. Usually, roughly
speaking, those end up being the minimalist tools that there's a
fighting chance the majority of developers can also work with
somewhat easily. For better or worse, that's why all of the
"official" build instructions for Virtual AGC on various target
platforms in the following sections are based simply on 'make'
(specifically, GNU 'make'), without the fancier kind of build
environments that may be easier for the user but have a steeper
learning curve for the developer. For example, among the
"fancy" build environments I'm referring to are those based on
autoconf/automake or CMake, which many would prefer. I
myself might prefer them ... as a user rather than a maintainer!
However, not everyone is as lazy as I or philosophically inclined
in quite the same way, so sometimes others step up to fill in the
gaps I've left. This is the case with CMake-based builds of
Virtual AGC. Michael Hirsch has stepped up to do so (thanks,
Michael!), and if the "official" instructions below don't appeal
to you, or if you simply like the idea of using CMake, Michael's documentation
for the CMake-based build process can be found in our GitHub
repository's wiki. Whether those instructions are
up-to-date or not is a question I'd prefer not to address.
Since Michael maintains both that wiki page and the CMake process
itself, please don't attempt to get any sensible response from me
(RSB) if you encounter problems with them or have questions.
You'll want to use our GitHub repository's issue system to report
problems, or direct inquiries via the GitHub communication system
to Michael's tag (@scivision).
Linux

|
This works!
Last verified (Ubuntu
24.04 64-bit): 2024-12-29
Last verified (Ubuntu 24.04.01 64-bit):
2025-04-30
Last verified (Linux Mint 21.3): 2024-12-29
Last verified (Linux Mint 22.1): 2025-04-30
|
I personally develop on Linux Mint, which is Ubuntu based, and these
instructions are targeted for those platforms. Presumably
builds can be performed on other Linux platforms, but the detailed
instructions will differ.
One-Time Setup
- Install the following packages, using either command-line
commands like "sudo apt-get install PackageName" or else
using whatever graphical package manager is provide. (On
Linux Mint, that would be Synaptic.)
- libsdl1.2-dev
- libncurses5-dev
- liballegro4-dev
- g++
- libgtk2.0-dev
- tcl
- tk
- If wxWidgets 3.2 is available in the package repository,
install its development package in the same manner described
above. Otherwise, download its
source code directly from the web, and build/install it
from source according to the instructions found there.
- Install both Python 3 and Python 2 if not already installed.
Note: Python 2 has essentially
been discontinued insofar as Ubuntu 24 is concerned, and I
suppose that other Linux distributions are not far
behind. In other words, it has become quite difficult to
install. If that's the case in your setup, don't
worry! Very few Python 2 scripts are present in Virtual
AGC, and all critical scripts are in Python 3.
Therefore, if you cannot install Python 2 it's almost
certainly okay, but you'll be missing some very minor features
of Virtual AGC until I can convert all remaining Python 2
scripts into Python 3.
Building Virtual AGC Once the One-Time Setup Is Complete
In the Virtual AGC source directory, run
make install
or
make clean install
This does not require a 'sudo', and you shouldn't
use one.
By the way, it's preferable to build Virtual AGC on a clean
Linux installation. If (like me) you have a system that's
used extensively for software development, you may have lots of
stuff installed beyond what's mentioned above. That extra
stuff may cause you problems. Hopefully that won't happen to
most people, but I suspect that a higher percentage of folks
interested in Virtual AGC would have this kind of problem than
those picked at random from the general population.
Sometimes, extra command-line switches for 'make' can be used to
eliminate conflicts by overriding the default compiler
choices. There are two such switches, FORCE_cc and FORCE_CC,
which respectively override the C compiler and the C++
compiler. See the comments in the
Makefile itself for more explanation. The switches can
override not merely the filesystem paths for locating the compiler
(when you have multiple versions of gcc or g++ installed), but can
be used to specify completely different C/C++ compilers, such as
clang (which might be installed using a command such as "sudo
apt-get install clang-3.9 libclang-3.9-dev"). As an
example, the command I use to build Virtual AGC using clang rather
than gcc/g++ is:
make FORCE_clang=yes
FORCE_cc=/usr/bin/clang-3.9 FORCE_CC=/usr/bin/clang++-3.9
clean install
The switch FORCE_clang in this case provides some
additional clang tweaks beyond just the compiler locations.
(Don't interpret this as a claim that clang is supported. It's
not! But you may be able to get away with using it, if you're
adventurous.)
Running VirtualAGC Once It Has Been Built
On supported Linux variants, the build process creates a desktop
icon from which you can run Virtual AGC. In some versions of
Linux, you will need to right-click the icon and indicate that it is
"trusted" before it will work properly. You can "uninstall" by
removing the icon, the ~/VirtualAGC folder (which is the
installation directory), and the source-code directory you
downloaded from GitHub.
On unsupported Linux variants, there may be no desktop icon or it
may not work, and you may need to run the program from a command
line, as follows:
cd ~/VirtualAGC/Resources
../bin/VirtualAGC
Raspberry Pi (Raspbian)
|
This worked
Last verified (Raspbian
Jessie): 2017-11-20
Last verified (Raspbian Stretch): 2018-05-11
See notes below for Raspbian Buster
|
Just refer to the generic Linux instructions in the preceding
section.
FreeBSD
|
This worked
Last verified: 2017-08-31
|
The instructions here relate to building Virtual AGC using PC-BSD 10.3, desktop version.
That
isn't the latest version of FreeBSD (version 11), but it's much
easier to install than FreeBSD proper, and should be 100% equivalent
for the same version numbers. At any rate, I know nothing
about FreeBSD, so my instructions may not be the most-efficient
ones. The executive summary is that the build process works,
and VirtualAGC acts normally once built.
Setup:
- Install 'cmake' and GNU 'make' (gmake) using the "package"
system, with the command "sudo pkg install cmake gmake".
- Install the "ports" system, if you haven't already.
- Install wxWidgets 2.8.12, or as close to that 2.8.x version as
you can get, using the "ports" system: "cd
/usr/ports/x11-toolkits/wxgtk28" and "sudo make install".
- For whatever reason, the 'wx-config' program is installed with
a different name. Make a symbolic link with the proper
name for it somewhere in your path: "mkdir $HOME/bin" and
"ln -s /usr/local/bin/wxgtk2u-2.8-config
$HOME/bin/wx-config". If you test this with the command
"wx-config --list", you should see that the default wxWidgets
configuration is "gtk2-unicode-release-2.8".
- Download Allegro 4.4.2,
or as close to that 4.4.x version as you can get. Prior to
building Allegro, I had to do this: "sudo ln -s
/usr/local/lib/libasound* /usr/lib"; I'm sure there's a much
cleaner way to handle that problem (namely, that Allegro
couldn't find libasound), but I don't know what it is. To
build and install, do this:
- "cd allegro-4.4.2"
- "mkdir Build"
- "cd Build"
- "cmake .."
- "make"
- "sudo make install"
Building Virtual AGC:
- In the Virtual AGC source directory, run "gmake FREEBSD=yes
install" or "gmake FREEBSD=yes clean install". (Note that
'sudo' is neither necessary nor desirable.) Note the use
of 'gmake' rather than just 'make'
This process creates a desktop icon from which you can run Virtual
AGC. You can "uninstall" by removing the icon, the
~/VirtualAGC folder, and the source-code directory you downloaded
from GitHub.
Solaris
|
This worked
Last verified: 2017-08-31
|
The instructions here relate to building Virtual AGC using Solaris
11.3. Note that my personal knowledge of Solaris is mid-way
between "completely ignorant" and "dangerously misinformed", so you
have to take what I say with a grain of salt. Nevertheless,
the executive summary is that the instructions do work.
One-time setup:
- Install
Oracle Developer Studio tools. I used version 12.5,
and only installed the tools rather than the complete IDE.
This is to give you the C and C++ compilers ('cc' and 'CC'),
which have command-line options required by wxWidgets but not
supported by 'gcc'.
- Install the Open CSW
system, add /opt/csw/bin to your PATH, and /opt/csw/lib to
LD_LIBRARY_PATH.
- Install wxWidgets via the Open CSW system.
- Install gtk2, tcl-8, tk-8, ncurses, freeglut, cmake, and
gnu-grep using the Package Manager.
Build Virtual AGC:
- In the Virtual AGC source directory (which for me was
~/git/virtualagc), run "gmake SOLARIS=yes install" or "gmake
SOLARIS=yes clean install". (Note that 'sudo' is neither
necessary nor desirable.) Note the use of 'gmake' (rather
than just 'make').
This creates a Virtual AGC launcher (which is actually just a shell
script) on the Desktop, and you can run Virtual AGC from that.
If it asks you whether to "Run" or "Run in terminal", the proper
choice is "Run". Unfortunately, no icon gets associated with
the launcher, but you can optionally associate one by right-clicking
on the launcher, selecting Properties, and using
~/VirtualAGC/Resources/ApolloPatch2-transparent.png as the image.
You can "uninstall" by the deleting the desktop launcher, the
~/VirtualAGC folder, and the source-code directory you downloaded
from GitHub.
Mac OS X
| |
This works!
Last verified (older
Macs): 2021-11-12
Last verified without LM_Simulator
(Monterey): 2025-04-30
See notes below for Sequoia
|
Without boring you with the details, I'll warn you that I'm crippled
in terms of testing most things to do with Mac OS. Now that
I've warned you, the subsections below cover what I know and what I
theorize about building Virtual AGC on Macs.
Older Macs
The executive summary is that this works (on my Mac, with
Mac OS X Lion 10.7.5 and Xcode 4.6.3) and the simulated AGC, DSKY,
etc., can be run. The only problem is that the pretty,
syntax-highlighted AGC source code may not be browsable from within
VirtualAGC.
Setup:
- Install most-current
version
of Xcode for your version of Mac OS X ... of course!
I use Xcode 4.6.3.
- Install MacPorts.
- Use MacPorts to install wxWidgets 2.8.12: "sudo port
install wxgtk-2.8" or "sudo port install wxWidgets-2.8",
depending on your Xcode version.
- Use MacPorts to install cmake: "sudo port install
cmake".
- Install Allegro 4.4.2:
- Use MacPorts: "sudo port install allegro". That
doesn't work on some versions of Xcode, in which case instead
use the next step. Be aware that Allegro version 5.x
does not work for our purposes, so alternate installations
like "sudo port install allegro5" aren't helpful.
- Install from source:
- Download and
unpack the source code for version 4.4.2.
- "cd allegro-4.4.2"
- "mkdir Build"
- "cd Build"
- "cmake .."
- "make"
- "sudo make install"
- If both of the approaches to installing Allegro
fail, as they did on my Mac, it's not a disaster, and you can
still proceed.
Building Virtual AGC:
- 'cd' into Virtual AGC source directory, as obtained from
GitHub.
- Determine where wxWidgets was installed by using the command
"port contents wxgtk-2.8 | grep /bin/" (or "port contents
wxWidgets-2.8 | grep /bin/"). What you're actually trying
to find out is the directory in which the program 'wx-config' is
installed. In my case, I found that the location was
/opt/local/Library/Frameworks/wxWidgets.framework/Versions/wxGTK/2.8/bin.
You
have to add that to your PATH, so that the 'wx-config' program
can be found during the build. The command is "export
PATH=$PATH:/opt/local/.../bin". You can test that it
worked with a command like "wx-config --list", from which we
would like to see that the default configuration is
"gtk2-unicode-release-2.8". By the way, unless you make
this change to the PATH permanent (which is done in ~/.profile),
the PATH will be reset back to the default one as soon as you
close the command-line terminal you're using for this.
- Do "make MACOSX=yes install" or "make MACOSX=yes clean
install".
The result is that a new app icon appears on the desktop, and you
can launch VirtualAGC from that.
However, not all features of the VirtualAGC GUI program
necessarily work. For example, while you can run simulated
AGCs (which is the main thing!), you may not be able to browse the
AGC source code from within VirtualAGC. What is supposed
to happen when you use VirtualAGC's source-browsing feature is
that it simply launches whatever default web-browser you have set
up on your system, and shows you the AGC/AEA source code within
that browser ... and indeed, this approach used to work in
Mac OS X. But what happens for me is that there's simply an
error message complaining that "There is no default application
configured for HTML files". However, I can certainly
configure the default browser, and have changed it back and forth
between Safari and Chrome, so I'm not sure what this message is
complaining about. Perhaps it's an X11 error. At any
rate, I have not been able to solve it. You can still browse
the source, of course: simply right-click on the VirtualAGC
app icon on the desktop, and select "show package contents";
navigate down to Contents/Resources/source/, select the mission
you're interested in, and double-click on the MAIN.agc.html file
you find in that directory. It will open up in your default
browser, just as it should have done in the VirtualAGC
program.
Another quirk that may be of interest on the Mac is how to run
individual GUI applications like yaDSKY2 or yaTelemetry, without
having to run the VirtualAGC application. Again, right-click
on the VirtualAGC desktop icon and select "show package
contents". Navigate down to Contents/MacOS/, and you'll find
the various individual GUI applications there, where you can
simply run them by double-clicking on them.
Mac OS Monterey
(The instructions in the next section are recommended
for Monterey rather than the ones in this section. This
section uses Macports to speed up the installation process, but
there are drawbacks to doing so, because the side effects can be
hard to undo later. You have been warned! These
instructions do seem to work if you don't mind inviting later
difficulties. On the other hand, if you happen to be using
Macports already anyway then you may as well proceed!)
Ludo Visser has sent me instructions for building Virtual AGC on
a clean installation of MacOS 12.0.1 (Monterey). Virtual AGC
itself required no changes. He does mention that he didn't
try it out with a joystick, but other than that indicates that
Virtual AGC does work "out of the box" after he builds it.
Recall the comments
already made about high-resolution displays. If your
Mac has such a display and you will use the environment variable AGC_SCALE
to correct for it, make sure that AGC_SCALE is
properly set (and exported) before proceeding.
Here are Ludo's instructions, verbatim:
- Install Xcode command line tools
xcode-select --install
- Install
Macports per the instructions.
- In a shell session:
          sudo port selfupdate
	  sudo port install git +credential_osxkeychain
          sudo port install wxWidgets-3.2
          port contents wxWidgets-3.2  | grep bin  # note path
          export PATH=/opt/local/Library/Frameworks/wxWidgets.framework/Versions/wxWidgets/3.1/bin:$PATH # path from command above
          export cc=clang
          export CC=clang++
          git clone https://github.com/virtualagc/virtualagc.git
          cd virtualagc
          make MACOSX=yes FORCE_clang=yes clean install
The various export commands listed above make changes
to the associated environment variables that are only
temporary. The associated environment variables will thus
disappear after the command-line shell is closed. In other
words, you'll have to use these very same commands every time you
open a command-line window to rebuild Virtual AGC. So you may
want to make the changes permanent instead. Unfortunately, the
method for making permanent changes to environment variables varies
by Mac OS version, as well as according to which command-shell
program is being used. If the zsh command shell
is being used, as is the case by default in Monterey, then the export
commands can be added to a file called ~/.zprofile to make them
permanent. If that doesn't work for you, I'm afraid you'll
have to research it yourself.
Note that while any Python scripts used above are in Python 3, which
is now installed by default (as far as I know) in Mac OS, some
Python 2 scripts are also present in Virtual AGC even though not
used in the installation process. Python 2 is no longer
installed by default, so in the relatively-rare case in which you
want to use one of those scripts you will need to explicitly install
Python 2. As of this writing, the
MacOS installer for the so-called "final" release of Python 2,
namely Python 2.7.18, can be found at python.org.
In general, Virtual AGC expects that either of the commands "python" or "python3" can be used
interchangeably to run Python 3, and thus certain uses will fail if
that's not true, so some additional setup is needed to restore the
expected functionality. Alas, there are so many possibilities
as to how this might fail and how it might be fixed that I cannot
much helpful guidance. I will limit myself to the following
observation: Verilog simulation of AGC electronics will fail
if the command "python"
does not run Python 3, but if the command "/usr/local/bin/python3"
does run Python 3, then the command
ln -s /usr/local/bin/python3 /usr/local/bin/python
will allow the command "python"
subsequently to work as expected and Verilog simulations to
function.
I'd also note that a full installation of Xcode is not necessary for
this build to succeed. It's merely necessary to have the Xcode
"command-line tools", which is a much smaller package than the full
Xcode. Admittedly, that's probably not a point that's of much
concern to Apple aficionados.
Note:
The first time you run VirtualAGC from its desktop icon
after installation, it may take a considerable amount of time to
start up. There will be no such delays on subsequent
startups.
Moreover, the first time you run it you may see a pop-up window
prompting you to grant it permission to modify files on your
desktop, which you should accept. The desktop files it
modifies are within the VirtualAGC app folder itself,
which just happens to reside on your desktop. In other
words, nothing outside of VirtualAGC itself is
modified. However, if you are security-conscious enough
that permitting this access seems scary, you can avoid the
problem by moving the VirtualAGC app to some other
folder not on the desktop. Perhaps to a dedicated folder
you create yourself. You'll still be asked for permission,
but it will be for the folder you've selected and not for your
desktop.
Indeed, I expect you could actually move the entire VirtualAGC
app from the desktop onto any Mac OS machine of the same version
or later as the machine on which you built it, though I have not
tried it and do not guarantee it.
Newer Macs
I'm told that the instructions given above for Mac OS Monterey do
not work as-is for some later versions of Mac OS, such as
Sequoia. Gavin Eadie (thanks, Gavin!) has sent me modified
instructions. The executive summary is that these
instructions are the same as for Monterey, except that wxWidgets
is built from source rather than installed via Macports.
That being the case, it would be my supposition that these
instructions should work just as well on Mac OS Monterey, Ventura,
or Sonoma as in Sequoia, but only time will tell.
Note: A full installation
of Xcode is not needed, though it's fine if present. It's
only necessary to have the so-called Xcode command-line tools,
which can either be installed stand-alone or else as part of a
full Xcode installation.
Recall the comments already
made about high-resolution displays. If your Mac has
such a display and you will use the environment variable AGC_SCALE
to correct for it, make sure that AGC_SCALE is
properly set (and exported) before proceeding. This causes AGC_SCALE
to be hard-coded into the Virtual AGC application. (But it can
be changed anytime afterward by modifying the file
VirtualAGC.app/Contents/Info.plist with a text editor.)
Here are the steps for building Virtual AGC:
- (One-time setup.) Install wxWidgets 3.2.x
(currently 3.2.6) by downloading
its source code, and building it from source according to
the
online instructions. It might be worth rebooting
after the build is complete. Building wxWidgets is simple
when it works, but takes an extremely long time! And there
are some traps to avoid:
- Apparently the build does not proceed correctly if any of
the folder names in its path contain any spaces.
- Do not create an environment variable
cc
(as described in the next step) before building
wxWidgets. If you do have such an environment variable,
get rid of it until after building of wxWidgets is complete.
- It appears to me that building wxWidgets will fail
if Macports has previously been used to install wxWidgets as
described in the preceding section.
Or more specifically, if Macports has installed some of the
libraries (such as libjpeg) that wxWidgets requires, because
those libraries will be of incompatible versions. On
solutions is to uninstall Macports and all of the packages
Macports had installed. The
instructions for doing so are in the Macports manual,
and it may be worth rebooting afterward. But if you
can't remove Macports, and if wxWidgets doesn't build for you
with Macports present, I'm not in a position to advise you how
to proceed.
- (One-time setup.) In all known recent versions of Mac OS
(Monterey through Sequoia), the version of Tcl/Tk (required for
Virtual AGC component LM_Simulator) installed by default
by Mac OS is defective, the symptom of which is the immediate
abort of the Tcl program wish. In other words,
this is one case where Mac OS "just doesn't work".
Ha! One distasteful workaround is to decide not to use LM_Simulator,
which you
can read about here to make a decision whether that's
satisfactory to you. Better from my point of view,
installation of a correctly-working version of Tcl/Tk can
probably be achieved in several ways. I am not personally
in a position to try any of those approaches, but I have reason
to believe that building
Tcl/Tk from source code does work on some recent
Mac OS versions but not others. Specifically, I'm told
that Tcl/Tk 9 works on Mac OS Sequoia. If you succeed in
such an alternate installation, there's some additional setup
that needs to be performed: See the section on installation of alternate
versions of Tcl/Tk.
- (Building Virtual AGC.) In a shell session:
          export cc=clang
          export CC=clang++
          git clone --depth=1 https://github.com/virtualagc/virtualagc.git
          cd virtualagc
          make MACOSX=yes FORCE_clang=yes clean install
The various export commands listed above make changes
to the associated environment variables that are only
temporary. The associated environment variables will thus
disappear after the command-line shell is closed. In other
words, you'll have to use these very same commands every time you
open a command-line window to rebuild Virtual AGC. So you may
want to make the changes permanent instead. Unfortunately, the
method for making permanent changes to environment variables varies
by Mac OS version, as well as according to which command-shell
program is being used. If the zsh command shell
is being used, as is the case by default in Monterey, then the export
commands can be added to a file called ~/.zprofile to make them
permanent. If the bash command shell is used,
then the file you need to edit is ~/.bashrc. If these don't
work for you, I'm afraid you'll have to research it yourself.
Note that while any Python scripts used above are in Python 3, which
is now installed by default (as far as I know) in Mac OS, some
Python 2 scripts are also present in Virtual AGC even though not
used in the installation process. Python 2 scripts are
gradually being phased out of Virtual AGC, but this process has not
yet completed. Python 2 is no longer installed by default, so
in the relatively-rare case in which you want to use one of those
scripts you will need to explicitly install Python 2. As of
this writing, the
MacOS installer for the so-called "final" release of Python 2,
namely Python 2.7.18, can be found at python.org.
Moreover, in general, Virtual AGC expects that either of the
commands "python" or "python3" can be used
interchangeably to run Python 3, and thus certain uses will fail if
that's not true, so some additional setup is needed to restore the
expected functionality. Alas, there are so many possibilities
as to how this might fail and how it might be fixed that I cannot
much helpful guidance. I will limit myself to the following
observation: Verilog simulation of AGC electronics will fail
if the command "python"
does not run Python 3, but if the command "/usr/local/bin/python3"
does run Python 3, then the command
ln -s /usr/local/bin/python3 /usr/local/bin/python
will allow the command "python"
subsequently to work as expected and Verilog simulations to
function.
But wait, there's more!
In spite of my own distaste for dealing with
Mac OS — which I admit may stem largely from the fact that I reject
the notion of being forced to buy new Macs whenever Apple decides
it'd be swell for them if I do so —, and my consequent lack of any
personal enthusiasm to support the platform, it ironically turns out
the Mac may be a platform in which you can get an improved Virtual
AGC experience relative to some other platforms.
How so? Well, when running AGC software in a simulation, the
emulation of the AGC CPU is typically supplemented by a simulated
DSKY (Display Keyboard). Traditionally, the simulated DSKY has
been provided by a Virtual AGC program called yaDSKY2.
My emphasis in the design of yaDSKY2 was its functionality
and cross-platform portability, with short shrift given to
superficial features — such as what it looks like! — that everybody
loves. As a result, yaDSKY2 leaves something to be
desired in terms of visual accuracy compared to the physical DSKY
and in its conformance to the conventions of the particular
computing platforms on which it's running. This is a
particular problem on Mac OS, since Apple aficionados have a more
strongly-shared view of how they expect Mac OS apps to appear and
behave than do (say) Linux users. For Mac OS, Gavin Eadie has
relieved some of my potential guilt [note: in reality I felt none at
all] on this front by creating an alternate simulated-DSKY program
that he calls ApoDisKey. ApoDisKey is not
provided within the Virtual AGC release proper, but rather is found
in Gavin's own GitHub repository, from
which you can download the executable form of the ApoDisKey
app or the source code (in Swift) for building ApoDisKey
using Xcode. I'm told that only Mac OS Sequoia and Sonoma are
officially supported, though ApoDisKey works for Mac OS
versions at least as early as Monterey, albeit as a separate build,
and any images you see below will in fact be from Mac OS
Monterey.
 Note:
If you do decide to use ApoDisKey and discover some
problem or think of a suggestion, report it directly to Gavin
and not to me! I've got enough problems of my own to worry
about, and couldn't fix a problem in Swift if I had a flying
laboratory to help me do so.
Note:
If you do decide to use ApoDisKey and discover some
problem or think of a suggestion, report it directly to Gavin
and not to me! I've got enough problems of my own to worry
about, and couldn't fix a problem in Swift if I had a flying
laboratory to help me do so.
Aside: You may suppose from your knowledge of Swift
— or if you're like me, from looking at swift.org
— that Swift is cross-platform, and hence that ApoDisKey
would run on Linux and Windows as well. My understanding
is that the cross-platform characterization disappears in a puff
of smoke if you are writing a graphical application vs a
command-line application, and thus ApoDisKey will remain
Mac-only for the foreseeable future.
To "install" ApoDisKey for use with the VirtualAGC
GUI, I found that all I had to do was to download the zip-file
containing the executable. There were no other installation
steps. I simply left the zip-file in my downloads
folder. I was even able to download multiple versions of ApoDisKey
over time, without bothering to erase or even rename the old ones,
because I have arranged for VirtualAGC to always use the
most-recently "installed" version. All of which I think is
pretty nifty.
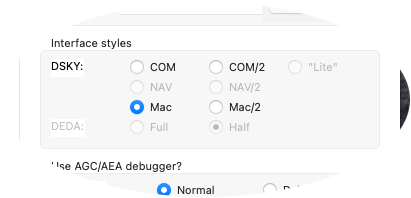
The presence of ApoDisKey does not automatically override
the use of yaDSKY2. Rather, when you run VirtualAGC,
you'll see choices of DSKY "interface styles", as in the image to
the right. The COM and COM/2 styles refer to yaDSKY2
(full-size and half-size respectively), while the Mac and Mac/2
styles refer instead to ApoDisKey. The Mac and Mac/2
options will be grayed-out and disabled if ApoDisKey isn't
found.
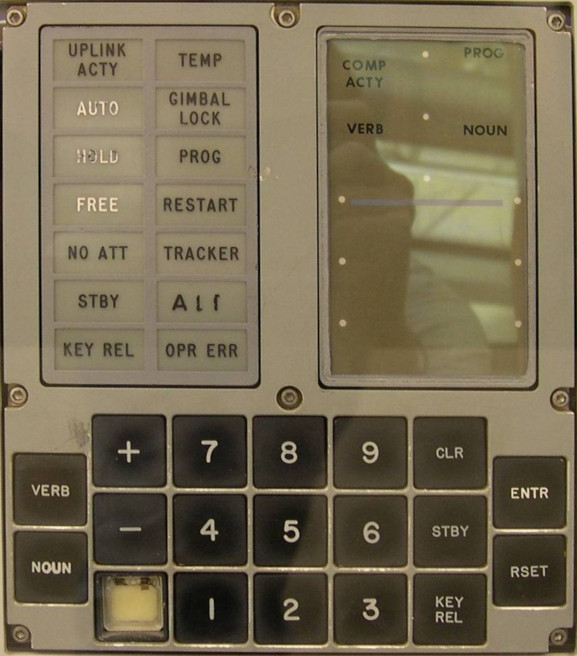
Having trouble deciding whether to install ApoDisKey or
not? The screenshots below give you a side-by-side
comparison of yaDSKY2 vs an actual (but battered very
early model) DSKY vs ApoDisKey on Mac OS Monterey.
Windows
| |
This works!
Last verified (RSB,
Windows 11): 2025-04-30
See notes below for discrepancies
|
This section describes installation instructions nominally for
Windows 11, and may or may not work on other versions of Windows
not specifically mentioned in the box above as having been
checked. The build will be performed using a Linux/Mac-like
command-line development environment called MSYS2, via
Linux/Mac-like tools available in that environment. But the
Virtual AGC programs produced by the build can be run directly
from your Windows desktop without any dependence on the
Linux/Mac-like process which created them.
Note:
At this writing, MSYS2 supports only Windows 10 or
later.
Aside: Presumably, a true
Windows user (unlike myself) would prefer a build process based
on Visual Studio, or at worst, on the Windows Subsystem for
Linux (WSL). I am not in a position to try these things
personally, but am willing to be instructed by anyone who can
get it working and give me the exact instructions without any
expectation that I can personally try them or debug them. I'd
guess that there would be a much better chance for WSL than for
Visual Studio, and that the
standard Linux build instructions could be a better place
to start than these Windows build instructions. On the
other hand, my guess about that has essentially zero value.
One-time setup:
- Install
MSYS2. You may be given several choices of
environment, the differences between which are inexplicable;
choose the UCRT64 environment.
Note: If you already have
installed MSYS2 but with an environment other than
UCRT64, it may become confusing with multiple environments
installed. Therefore, perhaps continuing with your
already-installed environment would be advisable instead of
installing UCRT64. Personally, I have not tried anything
other than UCRT64 for building Virtual AGC, so I cannot claim
that I know it will work.
- From the Windows menu, open an MSYS2 command line.
- From the MSYS2 command line, install various software
packages:
pacman -S make grep diffutils python3 python3-pip git wget unzip \
        $MINGW_PACKAGE_PREFIX-gcc \
	$MINGW_PACKAGE_PREFIX-libc++ \
	$MINGW_PACKAGE_PREFIX-winpthreads \
	$MINGW_PACKAGE_PREFIX-libsystre \
	$MINGW_PACKAGE_PREFIX-ncurses \
	$MINGW_PACKAGE_PREFIX-clang \
	$MINGW_PACKAGE_PREFIX-wxwidgets3.2-msw \
	$MINGW_PACKAGE_PREFIX-tcl \
	$MINGW_PACKAGE_PREFIX-tk
- The folder \msys64\ucrt64\bin will have to be added to your
PATH. Do this from the Control Panel. (From the
Windows menu, search for "edit environment variables".
Among the user variables, highlight the "Path" variable and hit
the Edit button, then add the folder. The change won't be
seen in command-line windows that are already open, and will
only take effect in new command lines.)
- Download the
entire Virtual AGC source tree. For brevity, I'm
going to assume that this ends up as a folder called virtualagc,
but you need to substitute the actual name in whatever build
instructions will be given later below. My personal
suggestion would be to get it via git, as in the
following command, because that makes it easy to keep up-to-date
later via "
git pull":
git clone --depth=1 https://github.com/virtualagc/virtualagc.git
Having performed the one-time setup, you can build Virtual AGC via
one of the following command sequences,
cd virtualagc

make WIN32=yes install
or
make WIN32=yes clean install
or
make cc=clang CC=clang++ WIN32=yes install
or
make cc=clang CC=clang++ WIN32=yes clean install
Which particular command you choose depends on whether you prefer to
compile using GNU gcc/g++, or whether you prefer to
compile using clang/clang++, and on whether you have
clutter from previous builds that you want to clear away.
The build process just described does not create a desktop
icon from which you can run the VirtualAGC GUI
interface. Windows has changed a lot since the good old days
when that was easy to do this and more importantly, when I knew
how to do it. In particular, programmatically creating a
desktop icon now apparently requires having administrative access,
which it didn't used to, and which it doesn't on Linux or Mac
OS. I don't want to mess with administrative access or
instruct you to mess with it.
But you can manually create a desktop icon yourself as
another one-time setup, with no administrative access
involved. Go figure! Here are the instructions for doing
so, based on the idea that the build process described above has
created an installation folder C:\Users\username\VirtualAGC.installed,
where username is your personal user name (and not the
literal string "username"). If VirtualAGC.installed has in
fact gone elsewhere for some reason, find it and alter the
instructions below accordingly.
- Right-click on an empty area of the desktop and select
New/Shortcut from the pop-up menu.
- You'll be prompted to enter the location of the program you're
creating a shortcut for. That will be C:\Users\username\VirtualAGC.installed\Resources\VirtualAGC.bat.
- At the next prompt, enter some convenient name for the
shortcut; for example, "VirtualAGC".
- Nominally that completes the process, and you're ready to go!
- But optionally, if you want to make the icon a little
prettier, right-click on the icon, select Properties, and hit
the "Change Icon" button. I'd recommend the file C:\Users\username\VirtualAGC.installed\Resources\ApolloPatch2-transparent.ico.
Alternately, you can directly run the VirtualAGC GUI
interface or any of the individual components of the AGC simulation
directly from a normal Windows command line, without ever having a
Desktop icon at all. Here, for example, is how to run the VirtualAGC
GUI interface if you're in your "home" directory in a normal Windows
command line:
cd VirtualAGC.installed\Resources
VirtualAGC.bat
Aside: Incidentally, while
I don't expect you'd have any occasion to do so, the directory
VirtualAGC.installed mentioned above should be self-contained,
in that it includes all executables and DLL's, so I expect you
could probably just copy the entire directory to any Windows
machine of the same version on which you built it or
later. I have not tried that, though, so I wouldn't bet
any money on it.
WebAssembly
|
This worked
Last verified (RSB, Linux Mint 21): 2022-09-25
|
I probably don't need to describe what WebAssembly (Wasm) is, since
anybody interested enough in reading about how to build Virtual
AGC for it almost certainly would know much more about it than I
do anyway. Nevertheless, here's what little I do know.
While WebAssembly apparently has a number of potential use cases,
the main use case for it at present seems to be as a way to port
applications so that they can run within a web browser ... but to
run somewhat faster than if they were instead ported to
JavaScript. Pragmatically, WebAssembly requires a browser
which actually supports the WebAssembly virtual machine, though as
of this writing (2021-05-26) such support is pretty widespread and
includes Firefox, Chrome, Edge, and Safari.
WebAssembly builds of Virtual AGC don't provide the entire Virtual
AGC suite of programs, but merely the AGC CPU emulation (yaAGC).
So the idea is that you can load the WebAssembly build of yaAGC
into an HTML web-page you create, along with a core-rope images of
an AGC program, and then run the whole thing in a supporting browser
of your choice. Of course, your web-page will also have to
provide its own simulation of a DSKY or whatever other of the AGC's
peripherals you desire. In principle, I suppose, you could
build an entire CM or LM simulation within your browser.
However, at least a part of that is available too, but separately
(as opposed to being in the Virtual AGC repository). It's
supplied by Michael Franzl, who also created the WebAssembly port in
the first place. Michael's
additional code (webAGC) can be found at this link. It
includes code for integrating webAGC into your website, and
provides:
- A DSKY model
- Live views of AGC i/o ports
- Live view of erasable memory
And there's a live demo,
so you can try it out without any additional effort. Any
description I would give of Michael's live demo would likely be
obsolete by the time you read it, but it's worth noting that (at
least at this writing) you have to use the live demo's "load program
into fixed memory" option first, choosing between the Luminary099
program and the Validation program, and then you have to click the
Run button to begin executing the AGC code. (Or the Step
button instead, if you simply want to execute a single AGC
instruction rather than to allow the AGC CPU to run freely.)
Subsequently, you can use either the DSKY buttons or else the "DSKY
key input" field to interact with the running AGC program.
Luminary099 refers to the AGC program used in the Apollo 11 LM,
while Validation is a "modern" AGC program originally written by me
to test the simulated AGC CPU. Some very basic instructions
for running Luminary099
or Validation
can be found on our website home page.
Of course, for some years there has already been a JavaScript
port of Virtual AGC: moonjs
by Shahriar Iravanian (live
demo), which runs the Colossus 249 AGC program (Apollo 9
CM). Moonjs is based on a
subset of JavaScript called asm.js, which is optimized to
allow faster-execution than arbitrarily-coded full-featured
JavaScript programs would. It would be interesting some day
to have a head-to-head speed competition between webAGC and
moonjs, though of course if both could achieve speed parity with a
physical AGC, then anything beyond that is gravy. Shahriar's
build
instructions for moonjs are pretty straightforward, and I
won't repeat them here. I should note that moonjs relies on
emscripten to port yaAGC.c
to asm.js, but that emscripten now seems to target WebAssembly
rather than asm.js, so that train may have left the station!
But as far as the WebAssembly port is concerned, here's my
interpretation of Michael's
build instructions for Linux Mint 19 or later, 64-bit.
The instructions won't work in Mint 17 or earlier because of
library-versioning problems. First, here is the one-time
setup:
- Installation of wasi-sdk. For the sake of argument let's
suppose the installation directory will be ~/wasi-sdk. You
can simply download the prebuilt release 16 tarball:
cd ~/wasi-sdk
wget
https://github.com/WebAssembly/wasi-sdk/releases/download/wasi-sdk-16/wasi-sdk-16.0-linux.tar.gz
tar xvf wasi-sdk-16.0-linux.tar.gz
export WASI_SDK_PATH=~/wasi-sdk/wasi-sdk-16.0
Note that although I called this a one-time setup, the environment
variable WASI_SDK_PATH will remain set only in this
particular instance of the command line window, and will not persist
if you open another command line afterward. This lack of
persistence only becomes a problem if you later need to compile the
WebAssembly target for Virtual AGC again in a new command-line
window, and hence need to set WASI_SDK_PATH again.
But you may wish to permanently set this environment variable to
avoid confusion later.
Actually building Virtual AGC's WebAssembly target is easy:
Just 'cd' into Virtual AGC source directory, as obtained
from GitHub, and then:
cd yaAGC
WASI=yes make [clean] yaAGC.wasm
The file yaAGC/yaAGC.wasm is what you actually need for your web
page, so this is the end of the build process for Virtual AGC
Insofar as the details of how to run an actual web page using this
yaAGC.wasm target are concerned, if you're a web expert you probably
don't need any additional commentary from me. For someone with
a lesser level of expertise, such as myself, perhaps a few more
words need to be said. I'll confine my remarks to Michael's
demo code, which is probably what you'd want to start with if you
were creating your own web app.
- Clone Michael's webAGC code base onto your local
computer. For example, use the command "git clone
--depth=1 https://github.com/michaelfranzl/webAGC".
The subdirectory webAGC/demo/ is the top-level code for the
web-page, webAGC/demo/agc/ contains the AGC core ropes, and the
subdirectory webAGC/src/ contains the WebAssembly
material. Specifically, the latter contains yaAGC.wasm,
and that's where you need to copy any new yaAGC.wasm you create
by compiling Virtual AGC.
- Install node.js if you don't
have it installed already. I don't know the version
requirements, but version 8 definitely does not work.
- You now have to serve the webAGC/demo directory via HTTP.
Follow the instructions in the README file of the demo
subdirectory.
Now, you may wonder why there's a need to run an HTTP server at all,
when one could simply browse to "file:///PathToWebAGC/demo/index.html"
rather than to "http://localhost:8000/demo/" and seemingly avoid
HTTP entirely? In other words, why can't this demo, or
presumably similar web apps, simply run entirely within the
browser? I'll simply quote what Michael has told me:
Browsers can read files even from hard
disk and display static websites (html, js, css) just like, say,
a word processor displays a word document. Strictly speaking, no
HTTP servers are required in that scenario. However, when using
more modern browser features, like JavaScript modules,
WebAssembly, WebRTC etc., the browser insists that content be
served over the network. This doesn't mean that servers need to
have any 'business logic' implemented; they can just be static
content delivery pipes. In this sense, the webAGC demo is
indeed a pure browser/client solution; it is completely unaware
of a server.
Which just reminds me of why I have always preferred not to
become involved in web programming, and came away frustrated every
time I was forced to do so.
iOS

|
Sorry!
|
I'm told that the iPhone instructions
which used to appear in this space, while valid back in 2009,
no longer work, and I don't have any substitutes to offer you at
present although I am aware of work on the ApoDisKey app described
earlier that may or may not yield results at some point.
Running the Validation
Suite of the simulated AGC
Having installed the software as above, you can test the emulated
CPU and DSKY using the "validation suite".
- Run the VirtualAGC
program, select "Validation suite" as the simulation type, and
hit the "Run" button.
- A code of "00" will appear in the PROG area of the DSKY, and
the OPR ERR lamp will flash. This means that the
validation program is ready to start.
- Press the PRO key on the DSKY. The OPR ERR light will go
off and the validation program will begin.
- There is no indication that the test is running. The
test takes about 77 seconds.
- If all tests are passed, then the PROG area on the DSKY will
show the code "77", and the OPR ERR lamp will flash. (The
return code is 77 because 77 is the largest 2-digit octal
number. It is just a coincidence that the test duration is
also 77 seconds.)
- If some tests fail, an error code other than "00" or "77" will
be displayed in the PROG area on the DSKY, and the OPR ERR lamp
will flash.
- In the latter case, you can proceed from one test to the next
by pressing the PRO key. The meanings of the error codes
are determined by reading the file Validation/Validation.agc.
If this doesn't work for some reason, refer to the trouble-shooting
info in the FAQ.
Some Resource Issues on
Slower Computers, Such as Raspberry Pi
On new but slow computers like Raspberry Pi, or old computers such
as PowerPC-based Macs, the CPU utilization for Virtual AGC can be
rather high. Indeed if you ran every available option on an
early-model Pi, you could find yourself using close to 100% of the
CPU. For the default configuration of VirtualAGC (Lunar Module
AGC with DSKY and Telemetry but without abort system or IMU), I find
the following:
- Pi B+: 80% CPU utilization.
- Pi 3: 40% CPU utilization.
If that's too much for you, there are some things you may be able
to do to make it more efficient. First, note that the
VirtualAGC program — which isn't a component of the simulation,
but merely a convenient graphical interface so that you don't have
to memorize command-line options for the actual components —
actually takes 25-30% of the CPU (for either of the two Pi models
mentioned above) all by itself. You don't really need to run
it if you don't want to. But how do you run a simulation
easily without VirtualAGC? Well, if you run the simulation
just once from VirtualAGC, and exit the simulation
immediately after starting it, you'll find that it has
automatically created a script called "simulate" which can be used
to start that exact configuration of the simulation without
running VirtualAGC itself. As a result, you get CPU
utilizations closer to 50% or 10%, respectively, on the two Pi
models mentioned above. To just run that script, you do
this:
cd VirtualAGC/temp/lVirtualAGC/Resources
./simulate
This page is available under the Creative
Commons
No Rights Reserved License
Last modified by Ronald Burkey on
2025-05-08